Online Tutorial Welcome and Introduction
Overview
Teaching: 5 min
Exercises: 0 minQuestions
What should I expect in participating in this Tutorial?
Objectives
Introduce instructors and mentors.
Provide overview of the modules
Spotlight helpful network provided by Slack channel.
Table of Contents for 01-introduction
- DUNE Computing Consortium
- Schedule
- Basic setup reminder
- Instructional Crew
- Support
DUNE Computing Consortium
The DUNE Computing Consortium works to establish a global computing network that will handle the massive data streams produced by distributing these across the computing grid. Selected consortia members coordinate DUNE computing activities to new members to acquaint them with the specific and DUNE software and resources.
DUNE Computing Consortium Coordinator: Michael Kirby (Brookhave National Laboratory)
This is a short 3 hour version of the basics. We will be adding/offering additional tutorials. An important recent one is:
The LArSoft tutorial at CERN, February 3-7, 2025 password on the tutorials page
Also check out the longer list of DUNE computing tutorials (collaborators only)
Workshop Introduction Video from December 2024
Basic setup reminder
You should have gone through the setup sequence
As a reminder you need to choose between running on sl7 in a container or al9. You do NOT want to mix them.
You also need to be starting in a clean terminal session. We recommend not having a .profile or .login at all and deliberately creating setup scripts that you source whenever you start using DUNE code.
source mysetup7.sh
Here are some example scripts that do most of the setups explained in this tutorial. You need to store these in your home area, source them every time you log in, and possibly update them as code versions evolve.
If you run into problems, check out the Common Error Messages page and the FAQ page
if that doesn’t help, use Slack to ask us about the problem - there is always a new one cropping up.
Instructional Crew
Organizers:
- Heidi Schellman (Oregon State University /FNAL)
- David DeMuth (Valley City State University)
Module Authors (in order of appearance in the schedule):
- Michael Kirby (FNAL): storage spaces
- Steven Timm (FNAL): data management
- Tom Junk (FNAL): art and LArSoft
Mentors
- Amit Bashyal (ANL)
- Aaron Higuera (Rice University)
- Pengfei Ding (FNAL)
- Barnali Chowdury (ANL)
- Nilay Bostan (University of Iowa)
Support
You must be on the DUNE Collaboration member list and have a valid FNAL or CERN account. See the old [Indico Requirement page][indico-event-requirements] for more information. Windows users are invited to review the Windows Setup page.
You should join the DUNE Slack instance and look in #computing-training-basics for help with this tutorial
go to https://atwork.dunescience.org/tools/ scroll down to Slack and request an invite. Please do not do this if you are already in DUNE Slack.
The livedoc is here livedoc
Key Points
This tutorial is brought to you by the DUNE Computing Consortium.
The goals are to give you the computing basis to work on DUNE.
DUNE Documentation
Overview
Teaching: 10 min
Exercises: 0 minQuestions
Where can I find documentation for DUNE
Objectives
Learn how to get access to DUNE documentation
Learn how to find DUNE documentation
Table of Contents for 01.5-documentation
- Documentation access
- DUNE tools list
- Docdb (Requires FNAL SSO)
- DUNE wiki (Requires FNAL SSO)
- CERN EDMS
- Github repositories
- DUNE Computing FAQ
Documentation access
Much of DUNE’s computing documentation is public and hosted in github
But some requires access via Fermilab SSO or CERN credentials. Documentation is protected for several reasons.
-
it includes specifics about computing systems that might assist hackers
-
it contains preliminary information about scientific or technical projects that have not been cleared for publication
-
it contains confidential details about contracts/purchases
-
it just ended up there
We strongly suggest that DUNE collaborators obtain both Fermilab computing accounts and, at least, a CERN Guest account.
Those actively engaged in running prototypes at CERN likely need to get full CERN Neutrino Platform computing access and join the appropriate egroups.
DUNE tools list
https://atwork.dunescience.org/tools/ lists a large number of DUNE data repositories.
This document highlights a sub-sample and how to access them
Docdb (Requires FNAL SSO)
Docdb is the main repository for analysis notes and physics results.
New DUNE collaborators should be given access automatically and can then use the SSO Link
if that isn’t working, use the Apply for access link on the main page.
DUNE wiki (Requires FNAL SSO)
The DUNE wiki is at https://wiki.dunescience.org
New users should be automatically added to the access list. If you can’t access the wiki please send mail to dune-communications@fnal.gov specifying the error you see. We’ve found that changing your email address can result in access problems.
Tutorials list on the wiki
https://wiki.dunescience.org/wiki/Computing_tutorials is a list of available tutorials.
CERN EDMS
Many technical specifications are stored in the CERN EDMS system
Most files are accessible without login but submitting documents requires a CERN computing account.
Github repositories
DUNE has a Github organization: https://github.com/DUNE/. Repositories in that organization are generally public to read but you need to request access through dune-communications@fnal.gov.
Many repositories have wikis or associated dune.github.io pages.
DUNE Computing FAQ
Lists of common connection problems and issues with running jobs.
Key Points
There is documentation somewhere!
Storage Spaces (2025)
Overview
Teaching: 30 min
Exercises: 15 minQuestions
What are the types and roles of DUNE’s data volumes?
What are the commands and tools to handle data?
Objectives
Understanding the data volumes and their properties
Displaying volume information (total size, available size, mount point, device location)
Differentiating the commands to handle data between grid accessible and interactive volumes
Table of Contents for 02-storage-spaces
- This is an updated version of the 2023 training - Live Notes
- Introduction
- Vocabulary
- Interactive storage volumes (mounted on dunegpvmXX.fnal.gov or lxplus.cern.ch)
- Summary on storage spaces
- Monitoring and Usage
- Commands and tools
- Quiz
- Useful links to bookmark
This is an updated version of the 2023 training
Workshop Storage Spaces Video from December 2024
Introduction
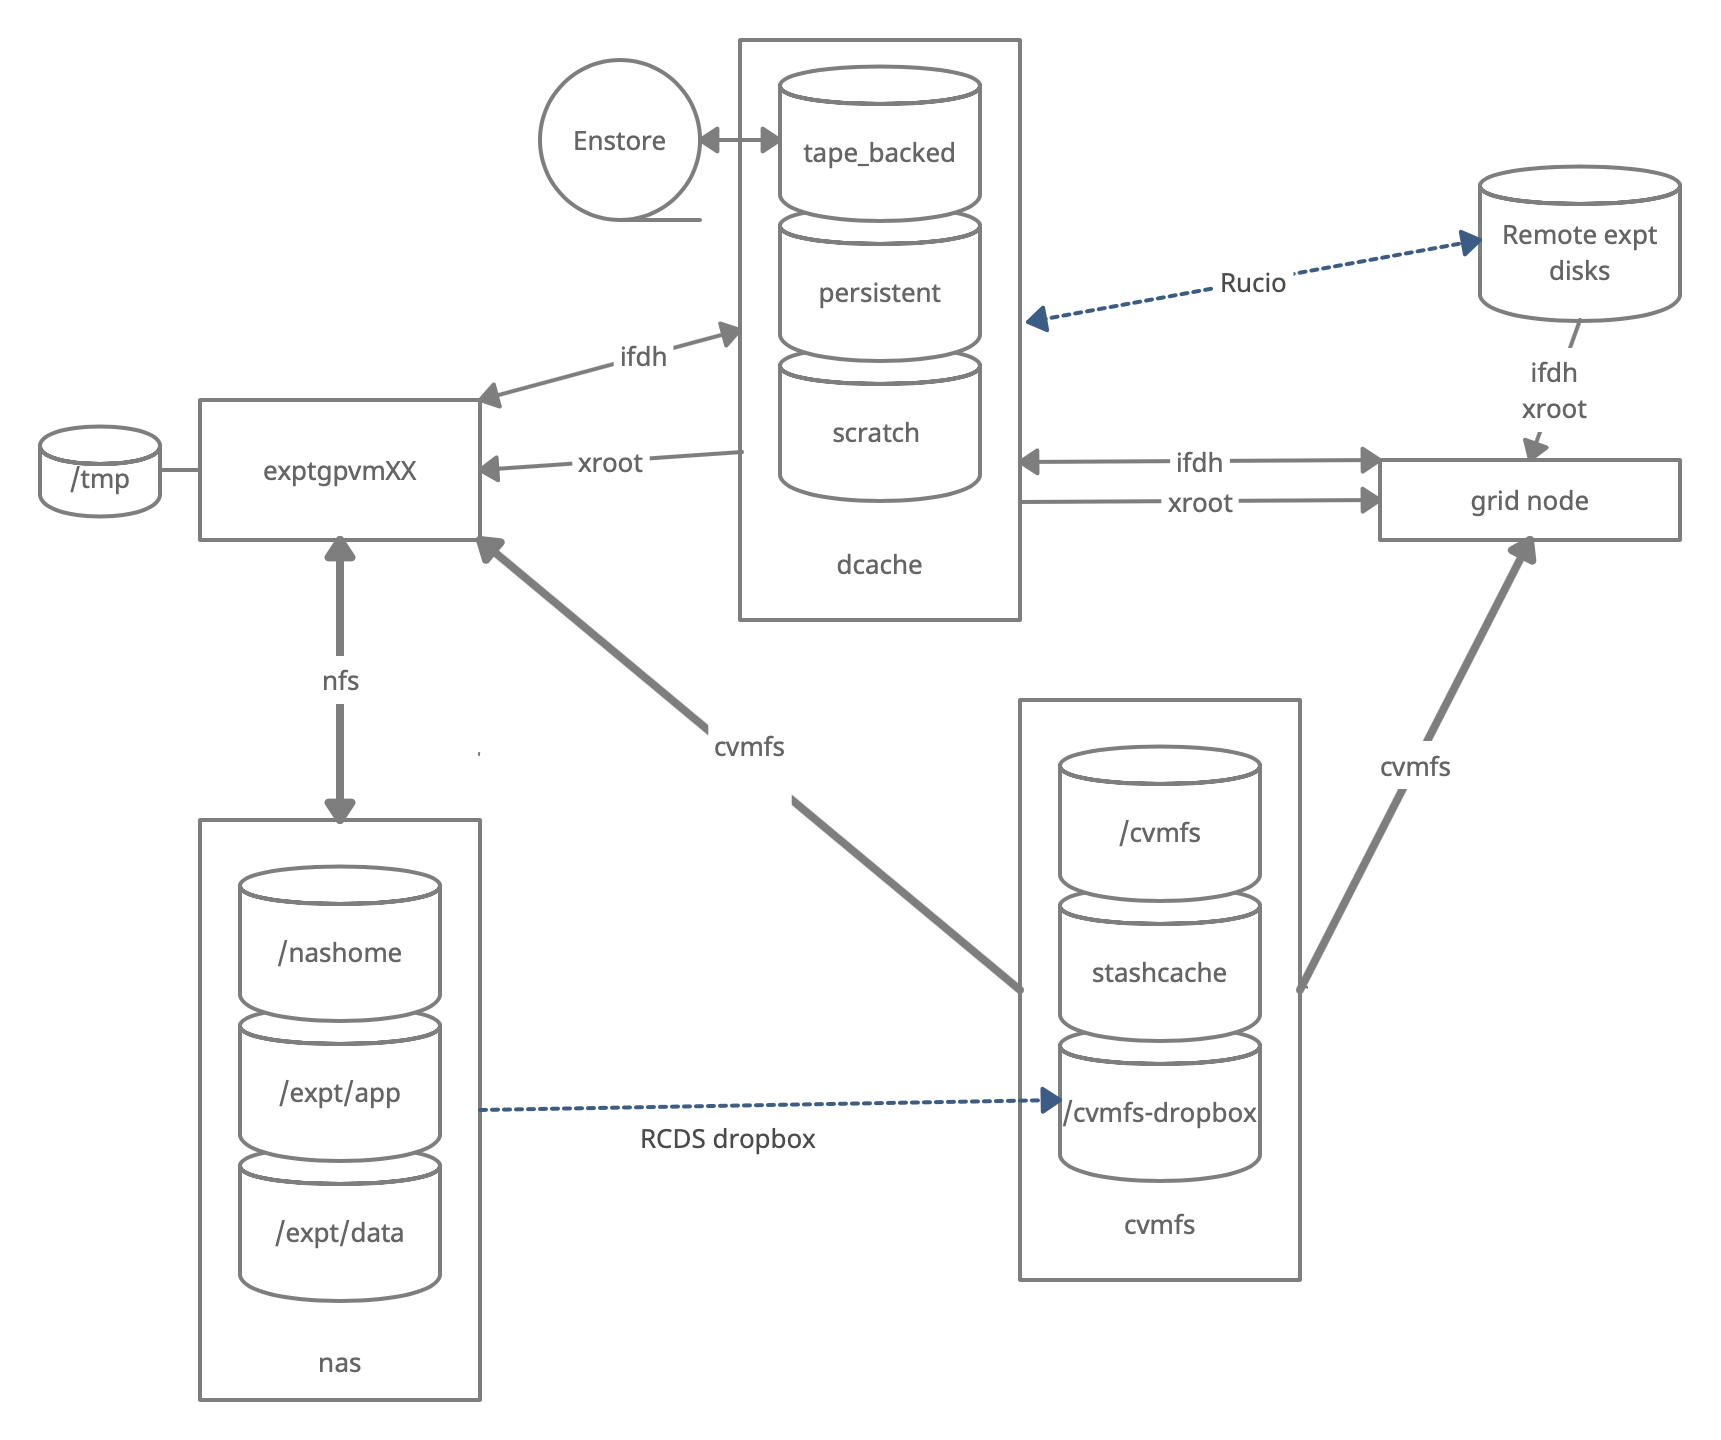
There are five types of storage volumes that you will encounter at Fermilab (or CERN):
- local hard drives
- network attached storage
- large-scale, distributed storage
- Rucio Storage Elements (RSE’s) (a specific type of large-scale, distributed storage)
- CERN Virtual Machine File System (CVMFS)
Each has its own advantages and limitations, and knowing which one to use when isn’t all straightforward or obvious. But with some amount of foresight, you can avoid some of the common pitfalls that have caught out other users.
Vocabulary
What is POSIX? A volume with POSIX access (Portable Operating System Interface Wikipedia) allow users to directly read, write and modify using standard commands, e.g. using bash scripts, fopen(). In general, volumes mounted directly into the operating system.
What is meant by ‘grid accessible’? Volumes that are grid accessible require specific tool suites to handle data stored there. Grid access to a volume is NOT POSIX access. This will be explained in the following sections.
What is immutable? A file that is immutable means that once it is written to the volume it cannot be modified. It can only be read, moved, or deleted. This property is in general a restriction imposed by the storage volume on which the file is stored. Not a good choice for code or other files you want to change.
Interactive storage volumes (mounted on dunegpvmXX.fnal.gov or lxplus.cern.ch)
Your home area
Your home area is similar to the user’s local hard drive but network mounted
- access speed to the volume very high, on top of full POSIX access
- network volumes are NOT safe to store certificates and tickets
- important: users have a single home area at FNAL used for all experiments
- not accessible from grid worker nodes
- not for code developement (home area is 5 GB)
at Fermilab
- you need a valid Kerberos ticket in order to access files in your Home area
- periodic snapshots are taken so you can recover deleted files. (/nashome/.snapshot)
- permissions are set so your collaborators cannot see files in your home area
- can find quota with command
quota -u -m -sat CERN
- CERN uses AFS for your home area
- AFS info from CERN
- get quota via the command
fs listquotaNote: your home area is small and private
You want to use your home area for things that only you should see. If you want to share files with collaborators you need to put them in the /app/ or /data/ areas described below.
Locally mounted volumes
local volumes are physical disks, mounted directly on the computer
- physically inside the computer node you are remotely accessing
- mounted on the machine through the motherboard (not over network)
- used as temporary storage for infrastructure services (e.g. /var, /tmp,)
- can be used to store certificates and tickets. (These are saved there automatically with owner-read enabled and other permissions disabled.)
- usually very small and should not be used to store data files or for code development
- files on these volumes are not backed up
Network Attached Storage (NAS)
NAS elements behaves similar to a locally mounted volume.
- functions similar to services such as Dropbox or OneDrive
- fast and stable POSIX access to these volumes
- volumes available only on a limited number of computers or servers
- not available on grid computing (FermiGrid, Open Science Grid, WLCG, HPC, etc.)
At Fermilab
- /exp/dune/app/users/….
has periodic snapshots in /exp/dune/app/.... /.snap, but /exp/dune/data does NOT - easy to share files with colleagues using /exp/dune/data and /exp/dune/app
- See the Ceph documentation for details on those systems.
At CERN
At CERN the analog is EOS See EOS for information about using EOS
Grid-accessible storage volumes
The following areas are grid accessible via methods such as xrdcp/xrootd and ifdh. You can read files in dCache across DUNE if you have the appropriate authorization. Writing files may require special permissions.
- At Fermilab, an instance of dCache+CTA is used for large-scale, distributed storage with capacity for more than 100 PB of storage and O(10000) connections.
- At CERN, the analog is EOS+CASTOR
At Fermilab (CTA) and CERN (CASTOR), files are backed up to tape and may not be immediately accessible.
DUNE also maintains disk copies of most recent files across many sites worldwide.
Whenever possible, these storage elements should be accessed over xrootd (see next section) as the mount points on interactive nodes are slow, unstable, and can cause the node to become unusable. Here are the different dCache volumes:
Persistent dCache
/pnfs/dune/persistent/ is “persistent” storage. If a file is in persistent dCache, the data in the file is actively available for reads at any time and will not be removed until manually deleted by user. The persistent dCache contains 3 logical areas: (1) /pnfs/dune/persistent/users in which every user has a quota up to 5TB total (2) /pnfs/dune/persistent/physicsgroups. This is dedicated for DUNE Physics groups and managed by the respective physics conveners of those physics groups.
https://wiki.dunescience.org/wiki/DUNE_Computing/Using_the_Physics_Groups_Persistent_Space_at_Fermilab gives more details on how to get access to these groups. In general, if you need to store more than 5TB in persistent dCache you should be working with the Physics Groups areas. (3) the “staging” area /pnfs/dune/persistent/staging which is not accessible by regular users but is by far the largest of the three. It is used for official datasets.
Scratch dCache
/pfns/dune/scratch is a large volume shared across all experiments. When a new file is written to scratch space, old files are removed in order to make room for the newer file. Removal is based on Least Recently Utilized (LRU) policy, and performed by an automated daemon.
Tape-backed dCache
Tape-backed disk based storage areas that have their contents mirrored to permanent storage on CTA tape.
Files are not available for immediate read on disk, but needs to be ‘staged’ from tape first (see video of a tape storage robot).
Rucio Storage Elements
Rucio Storage Elements (or RSEs) are storage elements provided by collaborating institution for official DUNE datasets. Data stored in DUNE RSE’s must be fully cataloged in the metacat catalog and is managed by the DUNE data management team. This is where you find the official data samples.
See the data management lesson for much more information about using the rucio system to find official data.
CVMFS
CVMFS is the CERN Virtual Machine File System is a centrally managed storage area that is distributed over the network, and utilized to distribute common software and a limited set of reference files. CVMFS is mounted over the network, and can be utilized on grid nodes, interactive nodes, and personal desktops/laptops. It is read only, and the most common source for centrally maintained versions of experiment software libraries/executables. CVMFS is mounted at /cvmfs/ and access is POSIX-like, but read only.
See CVMFS for more information.
What is my quota?
We use multiple systems so there are multiple ways for checking your disk quota.
Your home area at FNAL
quota -u -m -s
Your home area at CERN
fs listquota
The /app/ and /data/ areas at FNAL
These use the Ceph file system which has directory quotas instead of user quotas. See the quota section of: https://fifewiki.fnal.gov/wiki/Ceph#Quotas
The most useful commands for general users are
getfattr -n ceph.quota.max_bytes /exp/dune/app/users/$USER
getfattr -n ceph.quota.max_bytes /exp/dune/data/users/$USER
EOS at CERN
export EOS_MGM_URL=root://eosuser.cern.ch
eos quota
Fermilab dCache
Go to https://fndca.fnal.gov/cgi-bin/quota.py - you need to be on the Fermilab VPN - otherwise it sits there not loading.
Note - When reading from dcache always use the root: syntax, not direct /pnfs
The Fermilab dcache areas have NFS mounts. These are for your convenience, they allow you to look at the directory structure and, for example, remove files. However, NFS access is slow, inconsistent, and can hang the machine if I/O heavy processes use it. Always use the
xroot root://<site>… when reading/accessing files instead of/pnfs/directly. Once you have your dune environment set up thepnfs2xrootdcommand can do the conversion toroot:format for you (only for files at FNAL for now).
Summary on storage spaces
Full documentation: Understanding Storage Volumes
| Quota/Space | Retention Policy | Tape Backed? | Retention Lifetime on disk | Use for | Path | Grid Accessible | |
|---|---|---|---|---|---|---|---|
| Persistent dCache | Yes(5)/~400 TB/exp | Managed by User/Exp | No | Until manually deleted | immutable files w/ long lifetime | /pnfs/dune/persistent/users | Yes |
| Persistent PhysGrp | Yes(50)/~500 TB/exp | Managed by PhysGrp | No | Until manually deleted | immutable files w/ long lifetime | /pnfs/dune/persistent/physicsgroups | Yes |
| Scratch dCache | No/no limit | LRU eviction - least recently used file deleted | No | Varies, ~30 days (NOT guaranteed) | immutable files w/ short lifetime | /pnfs/dune/scratch | Yes |
| Tape backed | dCache No/O(40) PB | LRU eviction (from disk) | Yes | Approx 30 days | Long-term archive | /pnfs/dune/… | Yes |
| NAS Data | Yes (~1 TB)/ 62 TB total | Managed by Experiment | No | Until manually deleted | Storing final analysis samples | /exp/dune/data | No |
| NAS App | Yes (~100 GB)/ ~50 TB total | Managed by Experiment | No | Until manually deleted | Storing and compiling software | /exp/dune/app | No |
| Home Area (NFS mount) | Yes (~10 GB) | Centrally Managed by CCD | No | Until manually deleted | Storing global environment scripts (All FNAL Exp) | /nashome/<letter>/<uid> | No |
| Rucio | 25 PB | Centrally Managed by DUNE | Yes | Each file has retention policy | Official DUNE Data samples | use rucio/justIN to access | Yes |
Monitoring and Usage
Remember that these volumes are not infinite, and monitoring your and the experiment’s usage of these volumes is important to smooth access to data and simulation samples. To see your persistent usage visit here (bottom left):
And to see the total volume usage at Rucio Storage Elements around the world:
Resource DUNE Rucio Storage
Note - do not blindly copy files from personal machines to DUNE systems.
You may have files on your personal machine that contain personal information, licensed software or (god forbid) malware or pornography. Do not transfer any files from your personal machine to DUNE machines unless they are directly related to work on DUNE. You must be fully aware of any file’s contents. We have seen it all and we do not want to.
Commands and tools
This section will teach you the main tools and commands to display storage information and access data.
ifdh
Another useful data handling command you will soon come across is ifdh. This stands for Intensity Frontier Data Handling. It is a tool suite that facilitates selecting the appropriate data transfer method from many possibilities while protecting shared resources from overload. You may see ifdhc, where c refers to client.
Note
ifdhis much more efficient than NFS file access. Please use it and/orxrdcp/xrootdwhen accessing remote files.
Here is an example to copy a file. Refer to the Mission Setup for the setting up the DUNELAR_VERSION.
Note
For now do this in the Apptainer
Do the standard sl7 setup
once you are set up
export IFDH_TOKEN_ENABLE=1 # only need to do this once
ifdh cp root://fndcadoor.fnal.gov:1094/pnfs/fnal.gov/usr/dune/tape_backed/dunepro/physics/full-reconstructed/2023/mc/out1/MC_Winter2023_RITM1592444_reReco/54/05/35/65/NNBarAtm_hA_BR_dune10kt_1x2x6_54053565_607_20220331T192335Z_gen_g4_detsim_reco_65751406_0_20230125T150414Z_reReco.root /dev/null
This should go quickly as you are not actually writing the file.
Note, if the destination for an ifdh cp command is a directory instead of filename with full path, you have to add the “-D” option to the command line.
Prior to attempting the first exercise, please take a look at the full list of IFDH commands, to be able to complete the exercise. In particular, cp, rmdir,
Resource: ifdh commands
Exercise 1
use normal
mkdirto create a directory in your dCache scratch area (/pnfs/dune/scratch/users/${USER}/) called “DUNE_tutorial_2025” Using the `ifdh command, complete the following tasks:
- copy /exp/dune/app/users/${USER}/my_first_login.txt file to that directory
- copy the my_first_login.txt file from your dCache scratch directory (i.e. DUNE_tutorial_2024) to /dev/null
- remove the directory DUNE_tutorial_2025
- create the directory DUNE_tutorial_2025_data_file Note, if the destination for an ifdh cp command is a directory instead of filename with full path, you have to add the “-D” option to the command line. Also, for a directory to be deleted, it must be empty.
Note
ifdhno longer has amkdircommand as it auto-creates directories. In this example, we use the NFS commandmkdirdirectly for clarity.Answer
mkdir /pnfs/dune/scratch/users/${USER}/DUNE_tutorial_2025
ifdh cp -D /exp/dune/app/users/${USER}/my_first_login.txt /pnfs/dune/scratch/users/${USER}/DUNE_tutorial_2025
ifdh cp /pnfs/dune/scratch/users/${USER}/DUNE_tutorial_2025/my_first_login.txt /dev/null
ifdh rm /pnfs/dune/scratch/users/${USER}/DUNE_tutorial_2025/my_first_login.txt
ifdh rmdir /pnfs/dune/scratch/users/${USER}/DUNE_tutorial_2025
ifdh mkdir /pnfs/dune/scratch/users/${USER}/DUNE_tutorial_2025_data_file
xrootd
The eXtended ROOT daemon is a software framework designed for accessing data from various architectures in a complete scalable way (in size and performance).
XRootD is most suitable for read-only data access. XRootD Man pages
Issue the following command. Please look at the input and output of the command, and recognize that this is a listing of /pnfs/dune/scratch/users/${USER}/DUNE_tutorial_2024. Try and understand how the translation between a NFS path and an xrootd URI could be done by hand if you needed to do so.
xrdfs root://fndca1.fnal.gov:1094/ ls /pnfs/fnal.gov/usr/dune/scratch/users/${USER}/
Note that you can do
lar -c <input.fcl> <xrootd_uri>
to stream into a larsoft module configured within the fhicl file. As well, it can be implemented in standalone C++ as
TFile * thefile = TFile::Open(<xrootd_uri>)
or PyROOT code as
thefile = ROOT.TFile.Open(<xrootd_uri>)
What is the right xroot path for a file.
If a file is in /pnfs/dune/tape_backed/dunepro/protodune-sp/reco-recalibrated/2021/detector/physics/PDSPProd4/00/00/51/41/np04_raw_run005141_0003_dl9_reco1_18127219_0_20210318T104440Z_reco2_51835174_0_20211231T143346Z.root
the command
pnfs2xrootd /pnfs/dune/tape_backed/dunepro/protodune-sp/reco-recalibrated/2021/detector/physics/PDSPProd4/00/00/51/41/np04_raw_run005141_0003_dl9_reco1_18127219_0_20210318T104440Z_reco2_51835174_0_20211231T143346Z.root
will return the correct xrootd uri:
root://fndca1.fnal.gov:1094//pnfs/fnal.gov/usr/dune/tape_backed/dunepro/protodune-sp/reco-recalibrated/2021/detector/physics/PDSPProd4/00/00/51/41/np04_raw_run005141_0003_dl9_reco1_18127219_0_20210318T104440Z_reco2_51835174_0_20211231T143346Z.root
Note - if you don’t have pfns2xrootd on your system
Copy this to your local area, make it executable and use it instead.
you can then
root -l <that long root: path>
to open the root file.
This even works if the file is in Europe - which you cannot do with a direct /pnfs! (NOTE! not all storage elements accept tokens so this may not work for all files)
#Need to setup root executable in the environment first...
export DUNELAR_VERSION=v10_07_00d00
export DUNELAR_QUALIFIER=e26:prof
export UPS_OVERRIDE="-H Linux64bit+3.10-2.17"
source /cvmfs/dune.opensciencegrid.org/products/dune/setup_dune.sh
setup dunesw $DUNELAR_VERSION -q $DUNELAR_QUALIFIER
setup justin # use justin to get appropriate tokens
justin time  # this will ask you to authenticate via web browser
justin get-token # this actually gets you a token
root -l root://meitner.tier2.hep.manchester.ac.uk:1094//cephfs/experiments/dune/RSE/fardet-vd/fd/a6/prodmarley_nue_es_flat_radiological_decay0_dunevd10kt_1x8x14_3view_30deg_20250217T033222Z_gen_004122_supernova_g4stage1_g4stage2_detsim_reco.root
See the next episode on data management for instructions on finding files worldwide.
Note Files in /tape_backed/ may not be immediately accessible, those in /persistent/ and /scratch/ are.
Is my file available or stuck on tape?
files in /tape_backed/ storage at Fermilab are migrated to tape and may not be on disk? You can check this by doing the following in an AL9 window
gfal-xattr <xrootpath> user.statusif it is on disk you get
ONLINEif it is only on tape you get
NEARLINEor ‘UNKNOWN’ (This command doesn’t always work on SL7 so use an AL9 window)
The df command
To find out what types of volumes are available on a node can be achieved with the command df. The -h is for human readable format. It will list a lot of information about each volume (total size, available size, mount point, device location).
df -h
Exercise 3
From the output of the
df -hcommand, identify:
- the home area
- the NAS storage spaces
- the different dCache volumes
Quiz
Question 01
Which volumes are directly accessible (POSIX) from grid worker nodes?
- /exp/dune/data
- DUNE CVMFS repository
- /pnfs/dune/scratch
- /pnfs/dune/persistent
- None of the Above
Answer
The correct answer is B - DUNE CVMFS repository.
Question 02
Which data volume is the best location for the output of an analysis-user grid job?
- dCache scratch (/pnfs/dune/scratch/users/${USER}/)
- dCache persistent (/pnfs/dune/persistent/users/${USER}/)
- CTA tape (/pnfs/dune/tape_backed/users/${USER}/)
- user’s home area (`~${USER}`)
- CEPH data volume (/exp/dune/data or /exp/dune/app)
Answer
The correct answer is A, dCache scratch (/pnfs/dune/scratch/users/${USER}/).
Question 03
You have written a shell script that sets up your environment for both DUNE and another FNAL experiment. Where should you put it?
- DUNE CVMFS repository
- /pnfs/dune/scratch/
- /exp/dune/app/
- Your GPVM home area
- Your laptop home area
Answer
The correct answer is D - Your GPVM home area.
Question 04
What is the preferred way of reading a file interactively?
- Read it across the nfs mount on the GPVM
- Download the whole file to /tmp with xrdcp
- Open it for streaming via xrootd
- None of the above
Answer
The correct answer is C - Open it for streaming via xrootd. Use
pnfs2xrootdto generate the streaming path.Comment here
Useful links to bookmark
- ifdh commands (redmine)
- Understanding storage volumes (redmine)
- How DUNE storage works: pdf
Key Points
Home directories are centrally managed by Computing Division and meant to store setup scripts, do NOT store certificates here.
Network attached storage (NAS) /exp/dune/app is primarily for code development.
The NAS /exp/dune/data is for store ntuples and small datasets.
dCache volumes (tape, resilient, scratch, persistent) offer large storage with various retention lifetime.
The tool suites idfh and XRootD allow for accessing data with appropriate transfer method and in a scalable way.
CVMFS distributed file system
Overview
Teaching: 10 min
Exercises: 0 minQuestions
What is cvmfs
Objectives
Understand the roles of the CVMFS.
Table of Contents for 02.3-cvmfs
CVMFS
What is CVMFS and why do we need it?
DUNE has a need to distribute precompiled code to many different computers that collaborators may use. Installed products are needed for four things:
- Running programs interactively
- Running programs on grid nodes
- Linking programs to installed libraries
- Inspection of source code and data files
Results must be reproducible, so identical code and associated files must be distributed everywhere. DUNE does not own any batch resources – we use CPU time on computers that participating institutions donate to the Open Science Grid. We are not allowed to install our software on these computers and must return them to their original state when our programs finish running so they are ready for the next job from another collaboration.
CVMFS is a perfect tool for distributing software and related files. It stands for CernVM File System (VM is Virtual Machine). Local caches are provided on each target computer, and files are accessed via the /cvmfs mount point. DUNE software is in the directory /cvmfs/dune.opensciencegrid.org, and LArSoft code is in /cvmfs/larsoft.opensciencegrid.org. These directories are auto-mounted and need to be visible when one executes ls /cvmfs for the first time. Some software is also in /cvmfs/fermilab.opensciencegrid.org.
CVMFS also provides a de-duplication feature. If a given file is the same in all 100 releases of dunesw, it is only cached and transmitted once, not independently for every release. So it considerably decreases the size of code that has to be transferred.
When a file is accessed in /cvmfs, a daemon on the target computer wakes up and determines if the file is in the local cache, and delivers it if it is. If not, the daemon contacts the CVMFS repository server responsible for the directory, and fetches the file into local cache. In this sense, it works a lot like AFS. But it is a read-only filesystem on the target computers, and files must be published on special CVMFS publishing servers. Files may also be cached in a layer between the CVMFS host and the target node in a squid server, which helps facilities with many batch workers reduce the network load in fetching many copies of the same file, possibly over an international connection. Directories under /cvmfs may initially not show up if you type ls /cvmfs. Instead, accessing them the first time will automatically mount the appropriate volume, at least under Linux. CMVFS clients also exist for macOS, and there, the volumes may need to be listed explicitly when starting CVMFS on a mac.
CVMFS also has a feature known as “Stashcache” or “xCache”. Files that are in /cvmfs/dune.osgstorage.org are not actually transmitted in their entirety, only pointers to them are, and then they are fetched from one of several regional cache servers or in the case of DUNE from Fermilab dCache directly. DUNE uses this to distribute larger files such as photon library files, for instance.
CVMFS is by its nature read-all so code is readable by anyone in the world with a CVMFS client. CVMFS clients are available for download to desktops or laptops. Sensitive code must not be stored in CVMFS.
More information on CVMFS is available here
Restrictions
/cvmfs/ space is limited so general users cannot upload directy to ‘cvmfs’ or ‘stashcache’. They need to request an upload from the release managers or other experts.
Users do use /cvmfs/ indirectly through the ‘rcds’ dropbox system that sends their tarballs of local code to batch nodes.
Exercise 6
cd /cvmfsand do anlsat top level- What do you see–do you see the four subdirectories (dune.opensciencegrid.org, larsoft.opensciencegrid.org, fermilab.opensciencegrid.org, and dune.osgstorage.org)
- cd dune.osgstorage.org/pnfs/fnal.gov/usr/dune/persistent/stash/PhotonPropagation/LibraryData
Useful links to bookmark
- CVMFS on DUNE wiki: Access files in CVMFS
Key Points
CVMFS distributes software and related files without installing them on the target computer (using a VM, Virtual Machine).
Data Management (2025 updated for metacat/justIN/rucio)
Overview
Teaching: 30 min
Exercises: 15 minQuestions
What are the data management tools and software for DUNE?
Objectives
Learn how to access data from DUNE Data Catalog.
Learn a bit about the justIN workflow system for submitting batch jobs.
Table of Contents for 03-data-management
- Session Video - Live Notes
- Introduction
- How to find and access official data
- Official datasets
- What is metacat?
- Find a file in metacat
- Example of doing a metacat search
- then do queries to find particular groups of files
- What do those fields mean?
- find out how much raw data there is in a run using the summary option
- Fast web catalog queries
- Command line tools and advanced queries
- metacat web interface
- Example of finding reconstructed Monte Carlo
- you can use the web data catalog to do advanced searches
- get a limited number of files in a query
- find out how much data there is in a dataset
- What describes a dataset?
- What files are in that dataset and how do I use them?
- Finding those files on disk
- Getting file locations using Rucio
- More finding files by characteristics using metacat
- Accessing data for use in your analysis
- Quiz
- Useful links to bookmark
Session Video
The session video on December 10, 2024 was captured for your asynchronous review.
Introduction
What we need to do to produce accurate physics results
DUNE has a lot of data which is processed through a complicated chain of steps. We try to abide by FAIR (Findable, Accesible, Intepretable and Reproducible) principles in our use of data.
Our DUNE Physics Analysis Review Procedures state that:
-
Software must be documented, and committed to a repository accessible to the collaboration.
The preferred location is any repository managed within the official DUNE GitHub page: https://github.com/DUNE.
There should be sufficient instructions on how to reproduce the results included with the software. In particular, a good goal is that the working group conveners are able to remake plots, in case cosmetic changes need to be made. Software repositories should adhere to licensing and copyright guidelines detailed in DocDB-27141.
-
Data and simulation samples must come from well-documented, reproducible production campaigns. For most analyses, input samples should be official, catalogued DUNE productions.
How we do it ?
DUNE offical data samples are produced using released code, cataloged with metadata that describes the processing chain and stored so that they are accessible to collaborators.
DUNE data is stored around the world and you cannot directly log into most of the systems. For this purpose we use the metacat data catalog to describe the data and collections and the rucio file storage system to determine where replicas of files are and provide a url that allows you to process them. There is also a legacy SAM data access system that can be used for older files.
There are currently > 27M files cataloged in metacat with a total size of > 48 PB.
Key idea:
metacattells us what the file is and how it was made, with what software.ruciotells us where the file is, and gets it and keeps it where it is supposed to be.
All rucio entries should have a metacat entry describing them. With a few exceptions (retired, intermediate files), metacat entries correspond to real files in rucio.
How do I use this.
If you want to access data, this module will help you find and examine it.
If you want to process data using the full power of DUNE computing, you should talk to the data management group about methods for cataloging any data files you plan to produce. This will allow you to use DUNE’s collaborative storage capabilities to preserve and share your work with others and will be required for publication of results.
How to find and access official data
Official datasets
The production group make official datasets which are sets of files which share important characteristics such as experiment, data_tier, data_stream, processing version and processing configuration. Often all you need is an official dataset.
See DUNE Physics Datasets for a detailed description.
Fast web catalog queries
You can do fast string queries based on keywords embedded in the dataset name.
Go to dunecatalog and log in with your services password.
Choose your apparatus (Far Detector for example), use the category key to further refine your search and then type in keywords. Here I chose the Far Detectors tab and the FD-VD category from the pulldown menu.
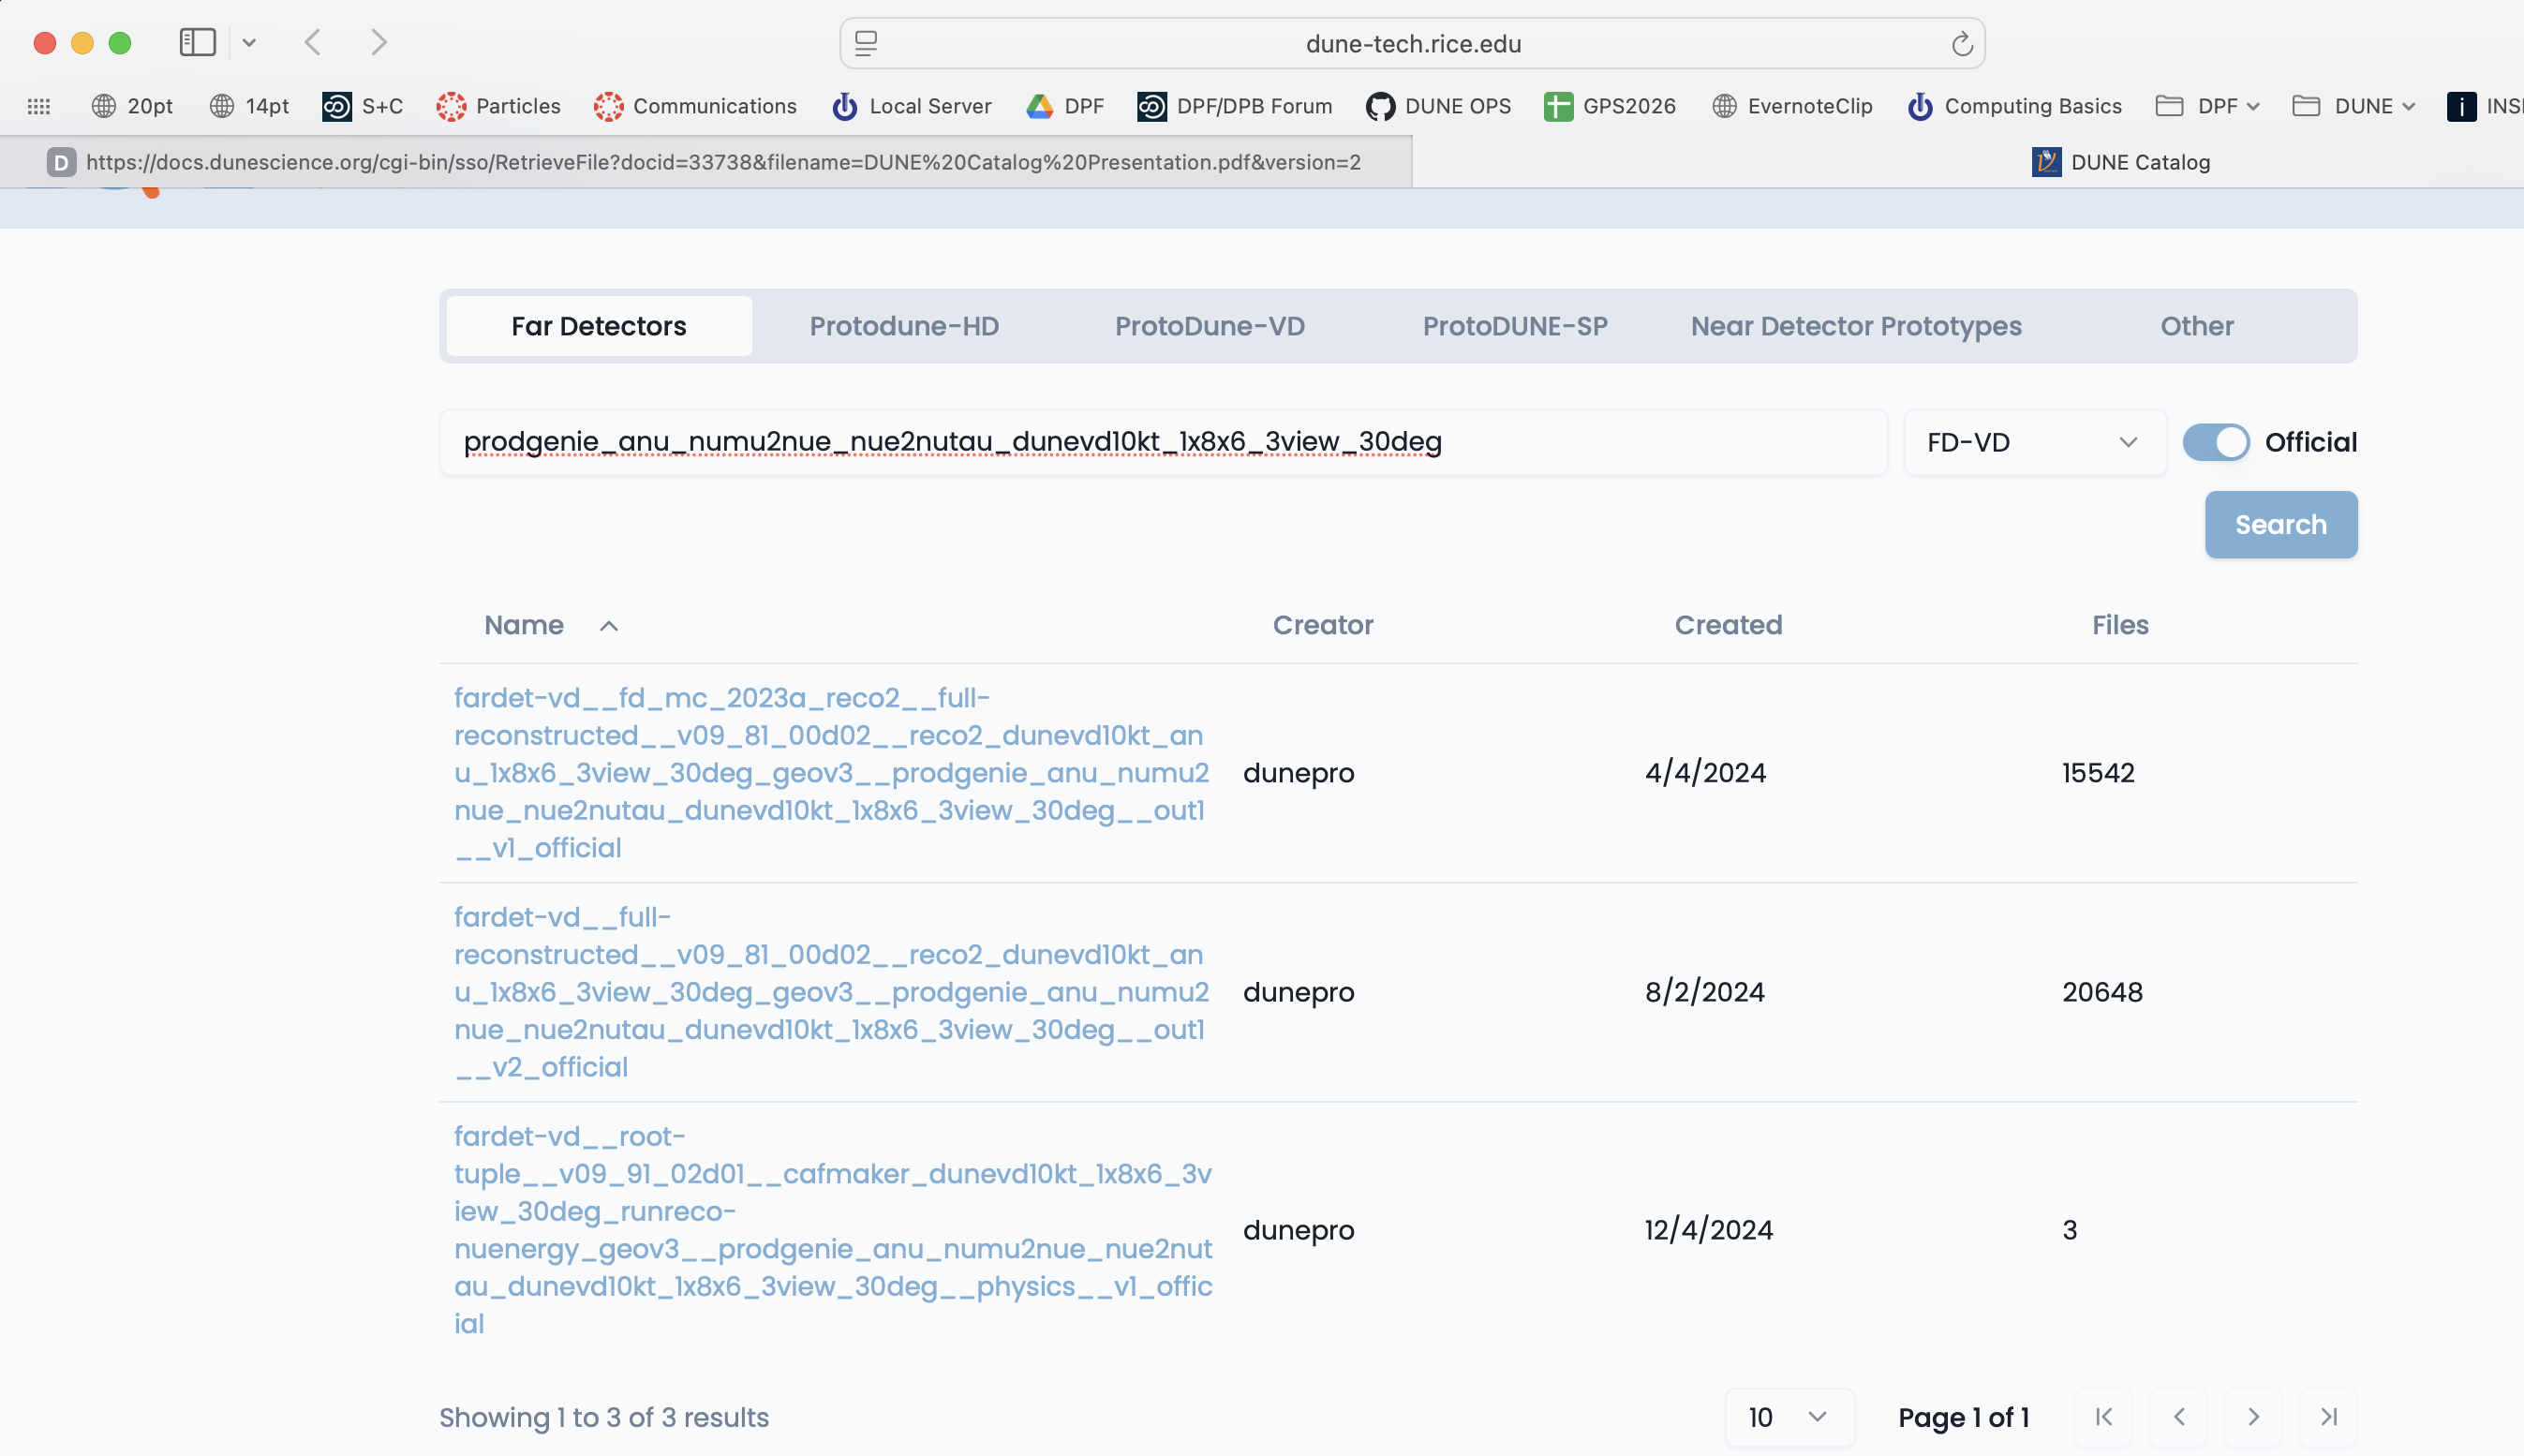
If you click on a dataset you can see a sample of the files inside it.
You can find a more detailed tutorial for the dunecatalog site at: Dune Catalog Tutorial
Command line tools and advanced queries
You can also explore and find the right dataset on the command line by using metacat dataset keys:
First you need to know your namespace and then explore within it.
metacat namespace list # find likely namespaces
There are official looking ones like hd-protodune-det-reco and ones for users doing production testing like schellma. The default for general use is usertests
Creation of namespaces by non-privileged users is currently disabled. A tool is in progress which will automatically make one namespace for each user
metacat web interface
Metacat also has a web interface that is useful in exploring file parentage metacat gui
Example of finding reconstructed Monte Carlo
Let’s look for some reconstructed Monte Carlo from the VD far detector.
metacat query "datasets matching fardet-vd:*official having core.data_tier=full-reconstructed"
Lots of output … looks like there are 2 types of official ones - let’s get “v2”
metacat query "datasets matching fardet-vd:*v2_official having core.data_tier=full-reconstructed"
and there are then several different generators. Let’s explore reconstructed simulation of the vertical drift far detector.
metacat query "datasets matching fardet-vd:*v2_official having core.data_tier=full-reconstructed and dune_mc.gen_fcl_filename=prodgenie_nu_numu2nue_nue2nutau_dunevd10kt_1x8x6_3view_30deg.fcl"
Ok, found the official neutrino beam dataset:
fardet-vd:fardet-vd__full-reconstructed__v09_81_00d02__reco2_dunevd10kt_nu_1x8x6_3view_30deg_geov3__prodgenie_nu_numu2nue_nue2nutau_dunevd10kt_1x8x6_3view_30deg__out1__v2_official
metacat query "datasets matching fardet-vd:*v2_official having core.data_tier=full-reconstructed and dune_mc.gen_fcl_filename=prodgenie_anu_numu2nue_nue2nutau_dunevd10kt_1x8x6_3view_30deg.fcl"
And the anti-neutrino dataset:
fardet-vd:fardet-vd__full-reconstructed__v09_81_00d02__reco2_dunevd10kt_anu_1x8x6_3view_30deg_geov3__prodgenie_anu_numu2nue_nue2nutau_dunevd10kt_1x8x6_3view_30deg__out1__v2_official
you can use the web data catalog to do advanced searches
You can also do keyword/value queries like the ones above using the Other tab on the web-based Data Catalog.
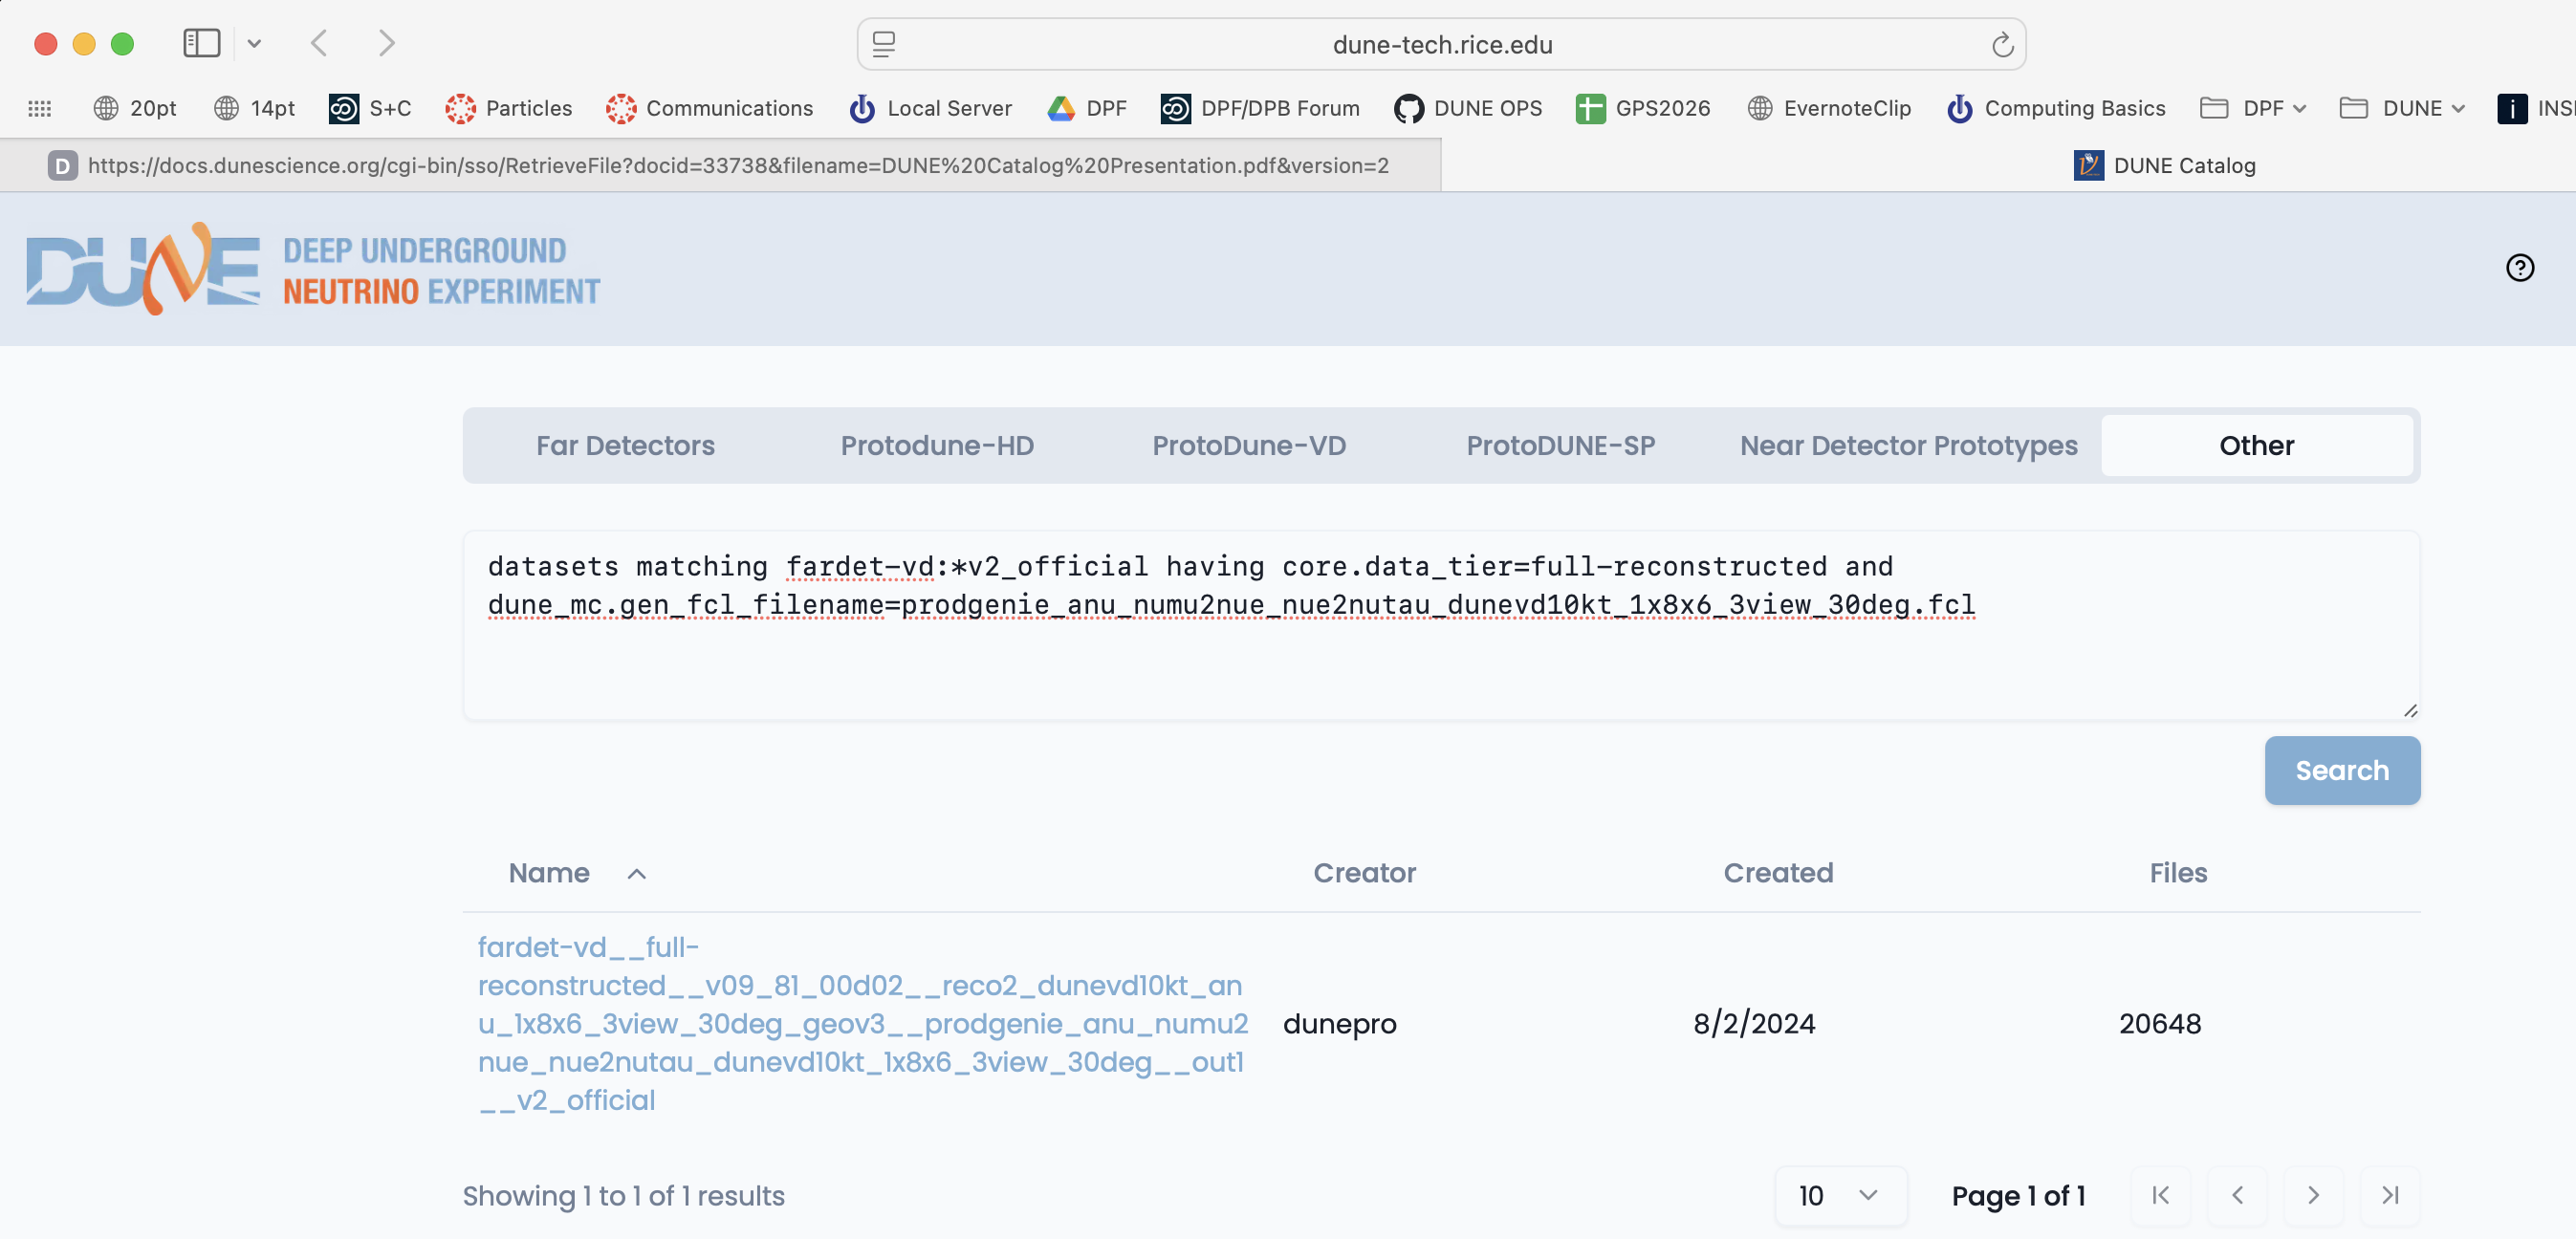
You can also query the catalogs yourself using metacat and rucio catalogs. Metacat contains information about file content and official datasets, rucio stores the physical location of those files. Files should have entries in both catalogs. Generally you ask metacat first to find the files you want and then ask rucio for their location.
What is metacat?
Metacat is a file and dataset catalog - it allows you to search for files and datasets that have particular attributes and understand their provenance, including details on all of their processing steps. It also allows for querying jointly the file catalog and the DUNE conditions database.
You can find extensive documentation on metacat at:
Find a file in metacat
DUNE runs multiple experiments (far detectors, protodune-sp, protodune-dp hd-protodune, vd-protodune, iceberg, coldboxes… ) and produces various kinds of data (mc/detector) and process them through different phases.
To find your data you need to specify at the minimum
core.run_type(the experiment: fardet-vd, hd-protodune …)core.file_type(mc or detector)core.data_tier(the level of processing raw, full-reconstructed, root-tuple …)
and when searching for specific types of data
core.data_stream(physics, calibration, cosmics)core.runs[any]=<runnumber>
For processed data you also need to know about
core.application.version(version of code run)dune.config_file(configuration file for the reconstruction/simulation)dune_mc.gen_fcl_filename(configuration for the initial simulation physics)dune.output_status(This should be ‘confirmed’ for processed files. If it is not, the file likely never got stored.)core.data_tier(what kind of output is it?)
Example of doing a metacat search
Here is an example of a metacat query that gets you raw files from a recent ‘hd-protodune’ cosmics run.
Note: there are example setups that do a full setup in the extras folder:
First get metacat if you have not already done so
SL7
Make certain you have dune software set up SL7 setup
AL9
Make certain you have AL9 set up AL9 setup
then do queries to find particular groups of files
metacat query "files from dune:all where core.file_type=detector and core.run_type=hd-protodune and core.data_tier=raw and core.runs[any]=27331 ordered limit 1"
this should give you a file:
hd-protodune:np04hd_raw_run027331_0254_dataflow0_datawriter_0_20240620T173408.hdf5
the string before the ‘:’ is the namespace and the string after is the filename.
You can find out more about your file by doing:
metacat file show -m -l hd-protodune:np04hd_raw_run027331_0254_dataflow0_datawriter_0_20240620T173408.hdf5
which gives you a lot of information:
checksums:
    adler32   : 5222f2ae
created_timestamp   :	2024-06-20 17:38:45.141418+00:00
creator             :	dunepro
fid                 :	83316551
name                :	np04hd_raw_run027331_0254_dataflow0_datawriter_0_20240620T173408.hdf5
namespace           :	hd-protodune
size                :	4238541524
updated_timestamp   :	1718905125.141418
metadata:
    core.data_stream    : physics
    core.data_tier      : raw
    core.end_time       : 1718904863.0
    core.event_count    : 35
    core.events         : [35564, 35568, 35572, 35576, 35580, 35584, 35588, 35592, 35596, 35600, 35604, 35608, 35612, 35616, 35620, 35624, 35628, 35632, 35636, 35640, 35644, 35648, 35652, 35656, 35660, 35664, 35668, 35672, 35676, 35680, 35684, 35688, 35692, 35696, 35700]
    core.file_content_status: good
    core.file_format    : hdf5
    core.file_type      : detector
    core.first_event_number: 35564
    core.last_event_number: 35700
    core.run_type       : hd-protodune
    core.runs           : [27331]
    core.runs_subruns   : [2733100001]
    core.start_time     : 1718904848.0
    dune.daq_test       : False
    retention.class     : physics
    retention.status    : active
children:
   hd-protodune-det-reco:np04hd_run27331_calibana_merged_1.root (cl7b7XQpTpS3PGm5)
   hd-protodune-det-reco:np04hd_raw_run027331_0254_dataflow0_datawriter_0_20240620T173408_reco_stage1_reco_stage2_20240926T225231_keepup_hists.root (Kf6CttcJRJu2uk58)
   hd-protodune-det-reco:np04hd_raw_run027331_0254_dataflow0_datawriter_0_20240620T173408_reco_stage1_reco_stage2_20240926T225231_keepup.root (sxh5FHKLTGym6pDp)
   hd-protodune-det-reco:np04hd_raw_run027331_0254_dataflow0_datawriter_0_20240620T173408_reco_stage1_reco_stage2_20240623T013207_keepup.root (Xl9QXEo0RouAqO0s)
   hd-protodune-det-reco:np04hd_raw_run027331_0254_dataflow0_datawriter_0_20240620T173408_reco_stage1_20240623T013207_keepup_hists.root (xWIH9tmnSWqWBJE5)
What do those fields mean?
look in the glossary to see what those fields mean.
Warning - there are multiple child files that look similar
Files can be reprocessed with different versions and can be reprocessesd twice if the batch system gets confused. Experts can tell them apart with specific queries about reconstruction versions and file status (in this case there were 2 reconstruction versions core.application.version = v09_90_02d00 and v09_91_02d01).
If you are doing real analysis please use the official datasets which experts have defined
if no official dataset exists, you need to require additional fields like:
dune.output_status=confirmedandcore.application.version=v09_91_02d01anddune.config_file=standard_reco_stage2_calibration_protodunehd_keepup.fclto make certain that the job that created the file actually wrote the output back to storage and you are not looking at 2 versions of the same file.
find out how much raw data there is in a run using the summary option
metacat query -s "files from dune:all where core.file_type=detector \
 and core.run_type=hd-protodune and core.data_tier=raw \
 and core.data_stream=physics and core.runs[any]=27331"
Files:        4144
Total size:   17553648200600 (17.554 TB)
get a limited number of files in a query
Batch workflows with more than 10,000 files are strongly discouraged (largely as when they fail, they fail BIG!). You can chop up larger sets by using the skip and limit fields in your query.
To chop up a big query into smaller chunks:
export MYBIGQUERY=<your query>
export MYQUERY1="$MYBIGQUERY ordered skip 0 limit 1000"
export MYQUERY2="$MYBIGQUERY ordered skip 1000 limit 1000"
export MYQUERY3="$MYBIGQUERY ordered skip 2000 limit 1000"
..etc.
-
the
orderedassures that your query is reproducible -
the
skipneeds to appear before thelimit
Always look at the output of your workflow on one of the queries before submitting them all.
find out how much data there is in a dataset
Do a query of a dataset using the -s or --summary option
metacat query -s "files from fardet-vd:fardet-vd__full-reconstructed__v09_81_00d02__reco2_dunevd10kt_anu_1x8x6_3view_30deg_geov3__prodgenie_anu_numu2nue_nue2nutau_dunevd10kt_1x8x6_3view_30deg__out1__v2_official"
Files:        20648
Total size:   34550167782531 (34.550 TB)
this may take a while as that is a big dataset.
What describes a dataset?
Let’s look at the metadata describing an anti-neutrino dataset: the -j means json output
metacat dataset show -j fardet-vd:fardet-vd__full-reconstructed__v09_81_00d02__reco2_dunevd10kt_anu_1x8x6_3view_30deg_geov3__prodgenie_anu_numu2nue_nue2nutau_dunevd10kt_1x8x6_3view_30deg__out1__v2_official
{
    "created_timestamp": 1722620726.662696,
    "creator": "dunepro",
    "description": "files where namespace='fardet-vd' and core.application.version=v09_81_00d02 and core.application.name=reco2 and core.data_stream=out1 and core.data_tier='full-reconstructed' and core.file_type=mc and core.run_type='fardet-vd' and dune.campaign=fd_mc_2023a_reco2 and dune.config_file=reco2_dunevd10kt_anu_1x8x6_3view_30deg_geov3.fcl and dune.requestid=ritm1780305 and dune_mc.detector_type='fardet-vd' and dune_mc.gen_fcl_filename=prodgenie_anu_numu2nue_nue2nutau_dunevd10kt_1x8x6_3view_30deg.fcl and dune.output_status=confirmed and core.group=dune",
    "file_count": 20648,
    "file_meta_requirements": {},
    "frozen": true,
    "metadata": {
        "core.application.name": "reco2",
        "core.application.version": "v09_81_00d02",
        "core.data_stream": "out1",
        "core.data_tier": "full-reconstructed",
        "core.file_type": "mc",
        "core.group": "dune",
        "core.run_type": "fardet-vd",
        "datasetpar.deftag": "v2_official",
        "datasetpar.max_time": null,
        "datasetpar.min_time": null,
        "datasetpar.namespace": "fardet-vd",
        "dune.campaign": "fd_mc_2023a_reco2",
        "dune.config_file": "reco2_dunevd10kt_anu_1x8x6_3view_30deg_geov3.fcl",
        "dune.output_status": "confirmed",
        "dune.requestid": "ritm1780305",
        "dune_mc.detector_type": "fardet-vd",
        "dune_mc.gen_fcl_filename": "prodgenie_anu_numu2nue_nue2nutau_dunevd10kt_1x8x6_3view_30deg.fcl"
    },
    "monotonic": false,
    "name": "fardet-vd__full-reconstructed__v09_81_00d02__reco2_dunevd10kt_anu_1x8x6_3view_30deg_geov3__prodgenie_anu_numu2nue_nue2nutau_dunevd10kt_1x8x6_3view_30deg__out1__v2_official",
    "namespace": "fardet-vd",
    "updated_by": null,
    "updated_timestamp": null
}
You can use any of those keys to refine dataset searches as we did above. You probably have to ask your physics group which are interesting.
What files are in that dataset and how do I use them?
You can either locate and click on a dataset in the web data catalog or use themetacat web interface or use the command line:
metacat query "files from fardet-vd:fardet-vd__full-reconstructed__v09_81_00d02__reco2_dunevd10kt_anu_1x8x6_3view_30deg_geov3__prodgenie_anu_numu2nue_nue2nutau_dunevd10kt_1x8x6_3view_30deg__out1__v2_official ordered limit 10"
will list the first 10 files in that dataset (you probably don’t want to list all 20648)
You can also use a similar query in your batch job to get the files you want.
Finding those files on disk
To find your files, you need to use Rucio directly or give the justIN batch system your query and it will locate them for you.
Getting file locations using Rucio
What is Rucio?
Rucio is the next-generation Data Replica service and is part of DUNE’s new Distributed Data Management (DDM) system that is currently in deployment. Rucio has two functions:
- A rule-based system to get files to Rucio Storage Elements around the world and keep them there.
- To return the “nearest” replica of any data file for use either in interactive or batch file use. It is expected that most DUNE users will not be regularly using direct Rucio commands, but other wrapper scripts that calls them indirectly.
As of the date of the 2025 tutorial:
- The Rucio client is available in CVMFS and Spack
- Most DUNE users are now enabled to use it. New users may not automatically be added.
You will need to authenticate to read files
For SL7 use justin to get a token
Interactive file access
To get a token that allows you to access files interactively in SL7
htgettoken -i dune --vaultserver htvaultprod.fnal.gov -r interactive
export BEARER_TOKEN_FILE=/run/user/`id -u`/bt_u`id -u`
export X509_CERT_DIR=/cvmfs/oasis.opensciencegrid.org/mis/certificates
put this in a file called dune_token.sh
The first time you do this you will see:
Attempting kerberos auth with https://htvaultprod.fnal.gov:8200 ... succeeded
Attempting to get token from https://htvaultprod.fnal.gov:8200 ... failed
Attempting OIDC authentication with https://htvaultprod.fnal.gov:8200

Complete the authentication at:
    https://cilogon.org/device/?user_code=XXXX
No web open command defined, please copy/paste the above to any web browser
Waiting for response in web browser
Go to that web site and authenticate
Storing vault token in /tmp/vt_uXXX
Saving credkey to /nashome/s/USER/.config/htgettoken/credkey-dune-interactive
Saving refresh token ... done
Attempting to get token from https://htvaultprod.fnal.gov:8200 ... succeeded
Storing bearer token in /run/user/XXXX/bt_XXXX
Accessing rucio and justIn resources requires a bit more
in SL7 - put this in a file called dune_data_sl7.sh so you can use it again.
setup metacat
setup rucio
export RUCIO_ACCOUNT=justinreadonly
setup justin
justin time # this just tells justin that you exist and want to authenticate
justin get-token # this actually gets a token and associated proxy for access to rucio and the batch system
The first time you do this you will get asked (after the justin time command)
To authorize this computer to run the justin command, visit this page with your
usual web browser and follow the instructions within the next 10 minutes:
https://dunejustin.fnal.gov/authorize/XXXXX

Check that the Session ID displayed on that page is BfhVBmQ

Once you've followed the instructions on that web page, please run the command
you tried again. You won't need to authorize this computer again for 7 days.
Once again go to the website that appears and authenticate. After the first authentication to justIn you need to do a second justin call
justin get-token
You will need to do this sequence weekly as your justin access expires.
Note:
Despite the name of this command it gets you both a token and a special X.509 proxy and it is the latter you are actually using to talk to rucio in these SL7 examples
for AL9 use htgettoken to get a token
Interactive file access
Make certain you have al9 set up
Then use htgettoken to get a token so you can read the files you find.
htgettoken -i dune --vaultserver htvaultprod.fnal.gov -r interactive
export BEARER_TOKEN_FILE=/run/user/`id -u`/bt_u`id -u`
The first time you do it it will ask you to authenticate using a web browser.
You should be able to read files at remote sites now.
You may need to repeat the htgettoken as the interactive tokens are pretty short-lived. Batch jobs do their own tokens.
Accessing rucio and justIn resources requires a bit more
You should already be set up above. Now you can use justIn to get you a token.
- First tell
justInknows about you
justin time
The first time you do this you will get asked (after the justin time command)
To authorize this computer to run the justin command, visit this page with your
usual web browser and follow the instructions within the next 10 minutes:
https://dunejustin.fnal.gov/authorize/XXXXX

Check that the Session ID displayed on that page is BfhVBmQ

Once you've followed the instructions on that web page, please run the command
you tried again. You won't need to authorize this computer again for 7 days.
Once again go to the website that appears and authenticate.
- After the first authentication to justIn you need to do a second justin call
justin get-token
You will need to do this sequence weekly as your justin access expires.
Note:
Despite the name of this command it gets you both a token and a special X.509 proxy and it is the latter you are actually using to talk to rucio in these SL7 examples
finding a file
Then use rucio to find out about a file’s locations. the –protocols flag makes certain you get the streaming root: location.
rucio replica list file fardet-vd:prodmarley_nue_es_flat_radiological_decay0_dunevd10kt_1x8x14_3view_30deg_20250217T033222Z_gen_004122_supernova_g4stage1_g4stage2_detsim_reco.root --pfns --protocols=root
returns 2 locations:
root://fndca1.fnal.gov:1094/pnfs/fnal.gov/usr/dune/tape_backed/dunepro//fardet-vd/hit-reconstructed/2025/mc/out1/le_mc_2024a/00/00/51/85/prodmarley_nue_es_flat_radiological_decay0_dunevd10kt_1x8x14_3view_30deg_20250217T033222Z_gen_004122_supernova_g4stage1_g4stage2_detsim_reco.root
root://meitner.tier2.hep.manchester.ac.uk:1094//cephfs/experiments/dune/RSE/fardet-vd/fd/a6/prodmarley_nue_es_flat_radiological_decay0_dunevd10kt_1x8x14_3view_30deg_20250217T033222Z_gen_004122_supernova_g4stage1_g4stage2_detsim_reco.root
which the locations of the file on disk and tape. We can use this to copy the file to our local disk or access the file via xroot.
Testing - access a file
Try to access the file at manchester using the command:
root -l root://meitner.tier2.hep.manchester.ac.uk:1094//cephfs/experiments/dune/RSE/fardet-vd/fd/a6/prodmarley_nue_es_flat_radiological_decay0_dunevd10kt_1x8x14_3view_30deg_20250217T033222Z_gen_004122_supernova_g4stage1_g4stage2_detsim_reco.root
_file0->ls()
It will complain because you haven’t loaded all the information needed to read an artroot file but you should be able to read it.
NOTE if you see a path in
/pnfs/usr/dune/tape_backedat Fermilab or oneosctapublic.cern.chthose are on tape and not generally accessible to the user. Try to get the file from the remaining one (in this case hep.manchester.ac.uk)
More finding files by characteristics using metacat
There isn’t always an official dataset so you can also list files directly using metacat.
To list raw data files for a given run:
metacat query "files where core.file_type=detector \
 and core.run_type='protodune-sp' and core.data_tier=raw \
 and core.data_stream=physics and core.runs[any] in (5141)"
core.run_typetells you which of the many DAQ’s this came from.core.file_typetells detector from mccore.data_tiercould be raw, full-reconstructed, root-tuple. Same data different formats.
protodune-sp:np04_raw_run005141_0013_dl7.root
protodune-sp:np04_raw_run005141_0005_dl3.root
protodune-sp:np04_raw_run005141_0003_dl1.root
protodune-sp:np04_raw_run005141_0004_dl7.root
...
protodune-sp:np04_raw_run005141_0009_dl7.root
protodune-sp:np04_raw_run005141_0014_dl11.root
protodune-sp:np04_raw_run005141_0007_dl6.root
protodune-sp:np04_raw_run005141_0011_dl8.root
Note the presence of both a namespace and a filename
What about some files from a reconstructed version?
metacat query "files from dune:all where core.file_type=detector \
 and core.run_type='protodune-sp' and core.data_tier=full-reconstructed  \
 and core.data_stream=physics and core.runs[any] in (5141) and dune.campaign=PDSPProd4 ordered limit 10"
pdsp_det_reco:np04_raw_run005141_0013_dl10_reco1_18127013_0_20210318T104043Z.root
pdsp_det_reco:np04_raw_run005141_0015_dl4_reco1_18126145_0_20210318T101646Z.root
pdsp_det_reco:np04_raw_run005141_0008_dl12_reco1_18127279_0_20210318T104635Z.root
pdsp_det_reco:np04_raw_run005141_0002_dl2_reco1_18126921_0_20210318T103516Z.root
pdsp_det_reco:np04_raw_run005141_0002_dl14_reco1_18126686_0_20210318T102955Z.root
pdsp_det_reco:np04_raw_run005141_0015_dl5_reco1_18126081_0_20210318T122619Z.root
pdsp_det_reco:np04_raw_run005141_0017_dl10_reco1_18126384_0_20210318T102231Z.root
pdsp_det_reco:np04_raw_run005141_0006_dl4_reco1_18127317_0_20210318T104702Z.root
pdsp_det_reco:np04_raw_run005141_0007_dl9_reco1_18126730_0_20210318T102939Z.root
pdsp_det_reco:np04_raw_run005141_0011_dl7_reco1_18127369_0_20210318T104844Z.root
To see the total number (and size) of files that match a certain query expression, then add the -s option to metacat query.
See the metacat documentation for more information about queries. DataCatalogDocs and check out the glossary of common fields at: MetaCatGlossary
Accessing data for use in your analysis
To access data without copying it, XRootD is the tool to use. However it will work only if the file is staged to the disk.
You can stream files worldwide if you have a DUNE VO certificate as described in the preparation part of this tutorial.
To learn more about using Rucio and Metacat to run over large data samples go here:
Full justIN/Rucio/Metacat Tutorial
Exercise 1
- Use
metacat query ....to find a file from a particular experiment/run/processing stage. Look in DataCatalogDocs for hints on constructing queries.- Use
metacat file show -m -l namespace:filenameto get metadata for this file. Note that--jsongives the output in json format.
When we are analyzing large numbers of files in a group of batch jobs, we use a metacat dataset to describe the full set of files that we are going to analyze and use the JustIn system to run over that dataset. Each job will then come up and ask metacat and rucio to give it the next file in the list. It will try to find the nearest copy. For instance if you are running at CERN and analyzing this file it will automatically take it from the CERN storage space EOS.
Exercise 2 - explore in the gui
The Metacat Gui is a nice place to explore the data we have.
You need to log in with your services (not kerberos) password.
do a datasets search of all namespaces for the word official in a dataset name
you can then click on sets to see what they contain
Exercise 3 - explore a dataset
Use metacat to find information about the dataset justin-tutorial:justin-tutorial-2024 How many files are in it, what is the total size. (metacat dataset show command, and metacat dataset files command) Use rucio to find one of the files in it.
Resources:
Quiz
Question 01
What is file metadata?
- Information about how and when a file was made
- Information about what type of data the file contains
- Conditions such as liquid argon temperature while the file was being written
- Both A and B
- All of the above
Answer
The correct answer is D - Both A and B.
Comment here
Question 02
How do we determine a DUNE data file location?
- Do `ls -R` on /pnfs/dune and grep
- Use `rucio replica list file` (namespace:filename) --pnfs --protocols=root
- Ask the data management group
- None of the Above
Answer
The correct answer is B - use
rucio replica list file(namespace:filename).Comment here
Useful links to bookmark
- DataCatalog: https://dune.github.io/DataCatalogDocs
- metacat: [https://dune.github.io/DataCatalogDocs/]
- rucio: [https://rucio.github.io/documentation/]
- Pre-2024 Official dataset definitions: dune-data.fnal.gov
- UPS reference manual
- UPS documentation (redmine)
- UPS qualifiers: About Qualifiers (redmine)
- mrb reference guide (redmine)
- CVMFS on DUNE wiki: Access files in CVMFS
Key Points
SAM and Rucio are data handling systems used by the DUNE collaboration to retrieve data.
Staging is a necessary step to make sure files are on disk in dCache (as opposed to only on tape).
Xrootd allows user to stream data files.
The old UPS code management system
Overview
Teaching: 15 min
Exercises: 5 minQuestions
How are different software versions handled?
Objectives
Understand the roles of the tools UPS (and Spack)
What is UPS and why do we need it?
Note
UPS is going away and only works on SL7 but we do not yet have a fully functional replacement. You need to be in the Apptainer to use it. UPS is being replaced by a new [spack][Spack Documentation] system for Alma9. We will be adding a Spack tutorial soon but for now, you need to use SL7/UPS to use the full DUNE code stack.
Go back and look at the SL7/Apptainer instructions to get an SL7 container for this section.
An important requirement for making valid physics results is computational reproducibility. You need to be able to repeat the same calculations on the data and MC and get the same answers every time. You may be asked to produce a slightly different version of a plot for example, and the data that goes into it has to be the same every time you run the program.
This requirement is in tension with a rapidly-developing software environment, where many collaborators are constantly improving software and adding new features. We therefore require strict version control; the workflows must be stable and not constantly changing due to updates.
DUNE must provide installed binaries and associated files for every version of the software that anyone could be using. Users must then specify which version they want to run before they run it. All software dependencies must be set up with consistent versions in order for the whole stack to run and run reproducibly.
The Unix Product Setup (UPS) is a tool to handle the software product setup operation.
UPS is set up when you setup DUNE:
Launch the Apptainer and then:
 source /cvmfs/dune.opensciencegrid.org/products/dune/setup_dune.sh
 export DUNELAR_VERSION=v10_07_00d00
 export DUNELAR_QUALIFIER=e26:prof
 setup dunesw $DUNELAR_VERSION -q $DUNELAR_QUALIFIER
dunesw: product name
$DUNELAR_VERSION version tag
$DUNELAR_QUALIFIER are “qualifiers”. Qualifiers are separated with colons and may be specified in any order. The e26 qualifier refers to a specific version of the gcc compiler suite, and prof means select the installed product that has been compiled with optimizations turned on. An alternative to prof is the debug qualifier. All builds of LArSoft and dunesw are compiled with debug symbols turned on, but the “debug” builds are made with optimizations turned off. Both kinds of software can be debugged, but it is easier to debug the debug builds (code executes in the proper order and variables aren’t optimized away so they can be inspected).
Another specifier of a product install is the “flavor”. This refers to the operating system the program was compiled for. These days we only support SL7, but in the past we used to also support SL6 and various versions of macOS. The flavor is automatically selected when you set up a product using setup (unless you override it which is usually a bad idea). Some product are “unflavored” because they do not contain anything that depends on the operating system. Examples are products that only contain data files or text files.
Setting up a UPS product defines many environment variables. Most products have an environment variable of the form <productname>_DIR, where <productname> is the name of the UPS product in all capital letters. This is the top-level directory and can be used when searching for installed source code or fcl files for example. <productname>_FQ_DIR is the one that specifies a particular qualifier and flavor. There is also
Exercise 3
- show all the versions of dunesw that are currently available by using the
ups list -aK+ duneswcommand- pick one version and substitute that for DUNELAR_VERSION and DUNELAR_QUALIFIER above and set up dunesw
Many products modify the following search path variables, prepending their pieces when set up. These search paths are needed by art jobs.
PATH: colon-separated list of directories the shell uses when searching for programs to execute when you type their names at the command line. The command which tells you which version of a program is found first in the PATH search list. Example:
which lar
will tell you where the lar command you would execute is if you were to type lar at the command prompt.
The other paths are needed by art for finding plug-in libraries, fcl files, and other components, like gdml files.
CET_PLUGIN_PATH
LD_LIBRARY_PATH
FHICL_FILE_PATH
FW_SEARCH_PATH
Also the PYTHONPATH describes where Python modules will be loaded from.
Try
which root
to see the version of root that dunesw sets up. Try it out!
UPS basic commands
| Command | Action |
|---|---|
ups list -aK+ dunesw |
List the versions and flavors of dunesw that exist on this node |
ups active |
Displays what has been setup |
ups depend dunesw v10_07_00d00 -q e20:prof |
Displays the dependencies for this version of dunesw |
Exercise 4
- show all the dependencies of dunesw by using “ups depend dunesw $DUNELAR_VERSION -q $DUNELAR_QUALIFIER”
UPS Documentation Links
Key Points
The Unix Product Setup (UPS) is a tool to ensure consistency between different software versions and reproducibility.
CVMFS distributes software and related files without installing them on the target computer (using a VM, Virtual Machine).
The new Spack code management system
Overview
Teaching: 15 min
Exercises: 5 minQuestions
How are different software versions handled?
Objectives
Understand the role of Spack
Table of Contents for 04-Spack
- What is Spack and why do we need it?
- Minimal spack for root analysis and file access
- A more flexible environment with more packages but you have to make choices of versions
- Spack basic commands
What is Spack and why do we need it?
- Spack basic commands
Note
UPS is being replaced by a new spack system for Alma9.
An important requirement for making valid physics results is computational reproducibility. You need to be able to repeat the same calculations on the data and MC and get the same answers every time. You may be asked to produce a slightly different version of a plot for example, and the data that goes into it has to be the same every time you run the program.
This requirement is in tension with a rapidly-developing software environment, where many collaborators are constantly improving software and adding new features. We therefore require strict version control; the workflows must be stable and not constantly changing due to updates.
DUNE must provide installed binaries and associated files for every version of the software that anyone could be using. Users must then specify which version they want to run before they run it. All software dependencies must be set up with consistent versions in order for the whole stack to run and run reproducibly.
Spack is a tool to handle the software product setup operation.
Minimal spack for root analysis and file access
You can get spack going with our minimal implementation
. /cvmfs/dune.opensciencegrid.org/dune-spack/spack-develop-fermi/setup-env.sh
spack env activate dune-tutorial
This sets up the file and job management packages (metacat, rucio, justin) and a version of root that can do streaming transfers. It is useful for end stage tuple analysis.
A full version with larsoft is in the works.
You can list what is available in that environment via
spack find
Which lists packages like this:
-- linux-almalinux9-x86_64_v2 / %c,cxx=gcc@12.5.0 ---------------
cmake@3.31.8               libffi@3.4.8          openssl@3.3.3    root@6.28.12
davix@0.8.10               libjpeg-turbo@3.0.4   patchelf@0.17.2  rust@1.85.0
ftgl@2.4.0                 libpng@1.6.47         pcre@8.45        unuran@1.8.1
ifdhc@2.8.0                lz4@1.10.0            postgresql@15.8  vdt@0.4.6
ifdhc-config@2.8.0         ninja@1.13.0          python@3.9.15    xrootd@5.6.9
intel-tbb-oneapi@2021.9.0  nlohmann-json@3.11.3  re2c@3.1         xxhash@0.8.3
This particular environment loads only one version of the packages.
A more flexible environment with more packages but you have to make choices of versions
An older instance with more packages and more flexibility is here: AL9 setup
Here if you execute the setup in AL9 setup and then try to do, for example
spack load geant4
you have to make a choice
==> Error: geant4 matches multiple packages.
  Matching packages:
    r2dcnvb geant4@10.6.1%gcc@12.2.0 arch=linux-almalinux9-x86_64_v3
    5pqylh6 geant4@10.6.1%gcc@12.2.0 arch=linux-almalinux9-x86_64_v2
  Use a more specific spec (e.g., prepend '/' to the hash).
Now you have to choose. I would go with ‘v3’. You can either use the hash or the full string - I tend to use the full string as it has more information.
You can do
spack load geant4@10.6.1%gcc@12.2.0 arch=linux-almalinux9-x86_64_v3 # pick v3or if you change your mind
spack unload geant4
spack load geant4/5pqylh6. # changed my mind and used the hash for v2
Also the PYTHONPATH describes where Python modules will be loaded from.
Try
which root
to see the version of root that spack sets up. Try it out!
Spack basic commands
| Command | Action |
|---|---|
spack list |
List everything spack knows about |
spack find |
Displays what is available in your environment |
spack load |
Load a package |
spack unload |
Unload a package |
Key Points
Spack is a tool to deliver well defined software configurations
CVMFS distributes software and related files without installing them on the target computer (using a VM, Virtual Machine).
End of the basics lesson - Continue on your own to learn how to build code and submit batch jobs
Overview
Teaching: 5 min
Exercises: 0 minQuestions
How do I learn more?
Objectives
Find out about more documentation
Find out how to ask for help from collaborators.
You can ask questions here:
-
DUNE Slack (collaborators only)
Channels
#computing-training-basicsand#larsoft-beginnersare a good start.#user_grid_usageis where you go to check if there are system problems. -
List of DUNE computing tutorials (collaborators only)
-
HEP Software Foundation Training Learn about
bash,github,python,cmake,rootand many more HEP computing packages
You can continue on with these additional modules.
-
The LArSoft tutorial at CERN, February 3-7, 2025 password on the tutorials page
- Make your code more efficient
- LArSoft basics
- Batch submission basics (coming soon)
Key Points
There is more documentation!
People are hear to help
Bonus episode -- Code-makeover on how to code for better efficiency
Overview
Teaching: 50 min
Exercises: 0 minQuestions
How to write the most efficient code?
Objectives
Learn good tips and tools to improve your code.
Improve your Code efficiency
Session Video
The session will be captured on video a placed here after the workshop for asynchronous study.
Live Notes
Code Make-over
How to improve your code for better efficiency
DUNE simulation, reconstruction and analysis jobs take a lot of memory and CPU time. This owes to the large size of the Far Detector modules as well as the many channels in the Near Detectors. Reading out a large volume for a long time with high granularity creates a lot of data that needs to be stored and processed.
CPU optimization:
Run with the “prof” build when launching big jobs. While both the “debug” and “prof” builds have debugging and profiling information included in the executables and shared libraries, the “prof” build has a high level of compiler optimization turned on while “debug” has optimizations disabled. Debugging with the “prof” build can be done, but it is more difficult because operations can be reordered and some variables get put in CPU registers instead of inspectable memory. The “debug” builds are generally much slower, by a factor of four or more. Often this difference is so stark that the time spent repeatedly waiting for a slow program to chug through the first trigger record in an interactive debugging session is more costly than the inconvenience of not being able to see some of the variables in the debugger. If you are not debugging, then there really is (almost) no reason to use the “debug” builds. If your program produces a different result when run with the debug build and the prof build (and it’s not just the random seed), then there is a bug to be investigated.
Compile your interactive ROOT scripts instead of running them in the interpreter At the ROOT prompt, use .L myprogram.C++ (even though its filename is myprogram.C). Also .x myprogram.C++ will compile and then execute it. This will force a compile. .L myprogram.C+ will compile it only if necessary.
Run gprof or other profilers like valgrind’s callgrind: You might be surprised at what is actually taking all the time in your program. There is abundant documentation on the web, and also the valgrind online documentation. There is no reason to profile a “debug” build and there is no need to hand-optimize something the compiler will optimize anyway, and which may even hurt the optimality of the compiler-optimized version.
The Debugger can be used as a simple profiler: If your program is horrendously slow (and/or it used to be fast), pausing it at any time is likely to pause it while it is doing its slow thing. Run your program in the debugger, pause it when you think it is doing its slow thing (i.e. after initialization), and look at the call stack. This technique can be handy because you can then inspect the values of variables that might give a clue if there’s a bug making your program slow. (e.g. looping over 1015 wires in the Far Detector, which would indicate a bug, such as an uninitialized loop counter or an unsigned loop counter that is initialized with a negative value.
Don’t perform calculations or do file i/o that will only later be ignored. It’s just a waste of time. If you need to pre-write some code because in future versions of your program the calculation is not ignored, comment it out, or put a test around it so it doesn’t get executed when it is not needed.
Extract constant calculations out of loops.
for (size_t i=0; i<n_channels; ++i)
{
sum += result.at(i)/TMath::Sqrt(2.0);
}
double f = TMath::Sqrt(0.5);
for (size_t i=0; i<n_channels; ++i)
{
sum += result.at(i)*f;
}
The example above also takes advantage of the fact that floating-point multiplies generally have significantly less latency than floating-point divides (this is still true, even with modern CPUs).
Use sqrt(): Don’t use pow() or TMath::Power when a multiplication or sqrt() function can be used.
The reason is that TMath::Power (or the C math library’s pow()) function must take the logarithm of one of its arguments, multiply it by the other argument, and exponentiate the result. Modern CPUs have a built-in SQRT instruction. Modern versions of pow() or Power may check the power argument for 2 and 0.5 and instead perform multiplies and SQRT, but don’t count on it.
If the things you are squaring above are complicated expressions, use TMath::Sq() to eliminate the need for typing them out twice or creating temporary variables. Or worse, evaluating slow functions twice. The optimizer cannot optimize the second call to that function because it may have side effects like printing something out to the screen or updating some internal variable and you may have intended for it to be called twice.
slow_function_calculating_x() +
slow_function_calculating_y()*
slow_function_calculating_y() );
TMath::Sq(slow_function_calculating_y()));
Don’t call sqrt() if you don’t have to.
{
do_something();
}
if (x*x + y*y < rcutsq)
{
do_something();
}
Use binary search features in the STL rather than a step-by-step lookup.
std::vector<int> my_vector;
(fill my_vector with stuff)

size_t indexfound = 0;
bool found = false;
for (size_t i=0; i<my_vector.size(); ++i)
{
  if (my_vector.at(i) == desired_value)
    {
	indexfound = i;
	found = true;
    }
}
If you have to search through a list of items many times, it is best to sort it and use std::lower_bound; see the example here.
std::map is sorted, and std::unordered_map uses a quicker hash table. Generally looking things up in maps is O(log(n)) and in a std::unordered_map is O(1) in CPU time, while searching for it from the beginning is O(n). The bad example above can be sped up by an average factor of 2 by putting a break statement after found=true; if you want to find the first instance of an object. If you want to find the last instance, just count backwards and stop at the first one you find; or use std::upper_bound.
Don’t needlessly mix floats and doubles.
std::vector <double> results;
(fill lots of results)
for (size_t i=0; i<results.size(); ++i)
{
float rsq = results.at(i)*result.at(i);
sum += rsq;
}
std::vector <double> results;
(fill lots of results)
for (size_t i=0; i<results.size(); ++i)
{
sum += TMath::Sq(results.at(i));
}
Minimize conversions between int and float or double
The up-conversion from int to float takes time, and the down-conversion from float to int loses precision and also takes time. Sometimes you want the precision loss, but sometimes it’s a mistake.
Check for NaN and Inf. While your program will still function if an intermediate result is NaN or Inf (and it may even produce valid output, especially if the NaN or Inf is irrelevant), processing NaNs and Infs is slower than processing valid numbers. Letting a NaN or an Inf propagate through your calculations is almost never the right thing to do - check functions for domain validity (square roots of negative numbers, logarithms of zero or negative numbers, divide by zero, etc.) when you execute them and decide at that point what to do. If you have a lengthy computation and the end result is NaN, it is often ambiguous at what stage the computation failed.
Pass objects by reference. Especially big ones. C and C++ call semantics specify that objects are passed by value by default, meaning that the called method gets a copy of the input. This is okay for scalar quantities like int and float, but not okay for a big vector, for example. The thing to note then is that the called method may modify the contents of the passed object, while an object passed by value can be expected not to be modified by the called method.
Use references to receive returned objects created by methods That way they don’t get copied. The example below is from the VD coldbox channel map. Bad, inefficient code courtesy of Tom Junk, and good code suggestion courtesy of Alessandro Thea. The infotohcanmap object is a map of maps of maps: std::unordered_map<int,std::unordered_map<int,std::unordered_map<int,int> > > infotochanmap;
{
int r = -1;
auto fm1 = infotochanmap.find(wib);
if (fm1 == infotochanmap.end()) return r;
auto m1 = fm1->second;
auto fm2 = m1.find(wibconnector);
if (fm2 == m1.end()) return r;
auto m2 = fm2->second;
auto fm3 = m2.find(cechan);
if (fm3 == m2.end()) return r;
r = fm3->second;
return r;
{
int r = -1;
auto fm1 = infotochanmap.find(wib);
if (fm1 == infotochanmap.end()) return r;
auto& m1 = fm1->second;
auto fm2 = m1.find(wibconnector);
if (fm2 == m1.end()) return r;
auto& m2 = fm2->second;
auto fm3 = m2.find(cechan);
if (fm3 == m2.end()) return r;
r = fm3->second;
return r;
}
Minimize cloning TH1’s. It is really slow.
Minimize formatted I/O. Formatting strings for output is CPU-consuming, even if they are never printed to the screen or output to your logfile. MF_LOG_INFO calls for example must prepare the string for printing even if it is configured not to output it.
Avoid using caught exceptions as part of normal program operation While this isn’t an efficiency issue or even a code readability issue, it is a problem when debugging programs. Most debuggers have a feature to set a breakpoint on thrown exceptions. This is sometimes necessary to use in order to track down a stubborn bug. Bugs that stop program execution like segmentation faults are sometimes easer to track down than caught exceptions (which often aren’t even bugs but sometimes they are). If many caught exceptions take place before the buggy one, then the breakpoint on thrown exceptions has limited value.
Use sparse matrix tools where appropriate. This also saves memory.
Minimize database access operations. Bundle the queries together in blocks if possible. Do not pull more information than is needed out of the database. Cache results so you don’t have to repeat the same data retrieval operation.
Use std::vector::reserve() in order to size your vector right if you know in advance how big it will be. std::vector() will, if you push_back() to expand it beyond its current size in memory, allocate twice the memory of the existing vector and copy the contents of the old vector to the new memory. This operation will be repeated each time you start with a zero-size vector and push_back a lot of data.
Factorize your program into parts that do i/o and compute. That way, if you don’t need to do one of them, you can switch it off without having to rewrite everything. Example: Say you read data in from a file and make a histogram that you are sometimes interested in looking at but usually not. The data reader should not always make the histogram by default but it should be put in a separate module which can be steered with fcl so the computations needed to calculate the items to fill the histogram can be saved.
Memory optimization:
Use valgrind. Its default operation checks for memory leaks and invalid accesses. Search the output for the words “invalid” and “lost”. Valgrind is a UPS product you can set up along with everything else. It is set up as part of the dunesw stack.
setup valgrind
valgrind --leak-check=yes --suppressions=$ROOTSYS/etc/valgrind-root.supp myprog arg1 arg2
More information is available here. ROOT-specific suppressions are described here. You can omit them, but your output file will be cluttered up with messages about things that ROOT does routinely that are not bugs.
Use massif. massif is a heap checker, a tool provided with valgrind; see documentation here.
Free up memory after use. Don’t hoard it after your module’s exited.
Don’t constantly re-allocate memory if you know you’re going to use it again right away.
Use STL containers instead of fixed-size arrays, to allow for growth in size. Back in the bad old days (Fortran 77 and earlier), fixed-size arrays had to be declared at compile time that were as big as they possibly could be, both wasting memory on average and creating artificial cutoffs on the sizes of problems that could be handled. This behavior is very easy to replicate in C++. Don’t do it.
Be familiar with the structure and access idioms. These include std::vector, std::map, std::unordered_map, std::set, std::list.
Minimize the use of new and delete to reduce the chances of memory leaks. If your program doesn’t leak memory now, that’s great, but years from now after maintenance has been transferred, someone might introduce a memory leak.
Use move semantics to transfer data ownership without copying it.
Do not store an entire event’s worth of raw digits in memory all at once. Find some way to process the data in pieces.
Consider using more compact representations in memory. A float takes half the space of a double. A size_t is 64 bits long (usually). Often that’s needed, but sometimes it’s overkill.
Optimize the big uses and don’t spend a lot of time on things that don’t matter. If you have one instance of a loop counter that’s a size_t and it loops over a million vector entries, each of which is an int, look at the entries of the vector, not the loop counter (which ought to be on the stack anyway).
Rebin histograms. Some histograms, say binned in channels x ticks or channels x frequency bins for a 2D FFT plot, can get very memory hungry.
I/O optimization:
Do as much calculation as you can per data element read. You can spin over a TTree once per plot, or you can spin through the TTree once and make all the plots. ROOT compresses data by default on write and uncompresses it on readin, so this is both an I/O and a CPU issue, to minimize the data that are read.
Read only the data you need ROOT’s TTree access methods are set up to give you only the requested TBranches. If you use TTree::MakeClass to write a template analysis ROOT macro script, it will generate code that reads in all TBranches and leaves. It is easy to trim out the extras to speed up your workflow.
Saving compressed data reduces I/O time and storage needs. Even though compressing data takes CPU, a slow disk or network can mean your workflow is in fact faster to trade CPU time instead of the disk read time.
Stream data with xrootd You will wait less for your first event than if you copy the file, put less stress on the data storage elements, and have more reliable i/o with dCache.
Build time optimization:
Minimize the number of #included files. If you don’t need an #include, don’t use it. It takes time to find these files in the search path and include them.
Break up very large source files into pieces. g++’s analysis and optimization steps take an amount of time that grows faster than linearly with the number of source lines.
Use ninja instead of make Instructions are here
Workflow optimization:
Pre-stage your datasets It takes a lot of time to wait for a tape (sometimes hours!). CPUs are accounted by wall-clock time, whether you’re using them or not. So if your jobs are waiting for data, they will run slowly even if you optimized the CPU usage. Pre-stage your data!
Run a test job If you have a bug, you will save time by not submitting large numbers of jobs that might not work.
Write out your variables in your own analysis ntuples (TTrees) You will likely have to run over the same MC and data events repeatedly, and the faster this is the better. You will have to adjust your cuts, tune your algorithms, estimate systematic uncertainties, train your deep-learning functions, debug your program, and tweak the appearance of your plots. Ideally, if the data you need to do these operatios is available interctively, you will be able to perform these tasks faster. Choose a minimal set of variables to put in your ntuples to save on storage space.
Write out histograms to ROOTfiles and decorate them in a separate script You may need to experiment many times with borders, spacing, ticks, fonts, colors, line widths, shading, labels, titles, legends, axis ranges, etc. Best not to have to re-compute the contents when you’re doing this, so save the histograms to a file first and read it in to touch it up for presentation.
Software readability and maintainability:
Keep the test suite up to date dunesw and larsoft have many examples of unit tests and integration tests. A colleague’s commit to your code or even to a different piece of code or even a data file might break your code in unexpected, difficult-to-diagnose ways. The continuous integration (CI) system is there to catch such breakage, and even small changes in run time, memory consumption, and data product output.
Keep your methods short If you have loaded up a lot of functionality in a method, it may become hard to reuse the components to do similar things. A long method is probably doing a lot of different things that can be given meaningful names.
Update the comments when code changes Not many things are more confusing than an out-of-date-comment that refers to how code used to work long ago.
Update names when meaning changes As software evolves, the meaning of the variables may shift. It may be a quick fix to change the contents of a variable without changing its name, but some variables may then contain contents that is the opposite of what the variable name implies. While the code will run, future maintainers will get confused.
Use const frequently The const keyword prevents overwriting variables unintentionally. Constness is how art protects the data in its event memory. This mechanism is exposed to the user in that pointers to const memory must be declared as pointers to consts, or you will get obscure error messages from the compiler. Const can also protect you from yourself and your colleagues when you know that the contents of a variable ought not to change.
Use simple constructs even if they are more verbose Sometimes very clever, terse expressions get the job done, but they can be difficult for a human to understand if and when that person must make a change. There is an obfuscated C contest if you want to see examples of difficult-to-read code (that may in fact be very efficient! But people time is important, too).
Always initialize variables when you declare them Compilers will warn about the use of uninitialized variables, so you will get used to doing this anyway. The initialization step takes a little time and it is not needed if the first use of the memory is to set the variable, which is why compilers do not automatically initialize variables.
Minimize the scope of variables Often a variable will only have a meaningful value iniside of a loop. You can declare variables as you use them. Old langauges like Fortran 77 insisted that you declare all variables at the start of a program block. This is not true in C and C++. Declaring variables inside of blocks delimiated by braces means they will go out of scope when the program exits the block, both freeing the memory and preventing you from referring to the variable after the loop is done and only considering the last value it took. Sometimes this is the desired behaviour, though, and so this is not a blanket rule.
Coding for Thread Safety
Modern CPUs often have many cores available. It is not unusual for a grid worker node to have as many as 64 cores on it, and 128 GB of RAM. Making use of the available hardware to maximize throughput is an important way to optimize our time and resources. DUNE jobs tend to be “embarrassingly parallel”, in that they can be divided up into many small jobs that do not need to communicated with one another. Therefore, making use of all the cores on a grid node is usually as easy as breaking a task up into many small jobs and letting the grid schedulers work out what jobs run where. The issue however is effective memory usage. If several small jobs share a lot of memory whose contents do not change (code libraries loaded into RAM, geometry description, calibration constants), then one can group the work together into a single job that uses multiple threads to get the work done faster. If the memory usage of a job is dominated by per-event data, then loading multiple events’ worth of data in RAM in order to keep all the cores fed with data may not provide a noticeable improvement in the utilization of CPU time relative to memory time.
Sometimes multithreading has advantages within a trigger record. Data from different wires or APAs may be processed simultaneously. One thing software managers would like to make sure is controllable is the number of threads a program is allowed to spawn. Some grid sites do not have an automatic protection against a program that creates more threads than CPUs it has requested. Instead, a human operator may notice that the load on a system is far greater than the number of cores, and track down and ban the offending job sumitter (this has already happened on DUNE). If a program contains components, some of which manage their own threawds, then it becomes hard to manage the total thread count in a program. Multithreaded art keeps track of the total thread count using TBB, or Thread Building Blocks.
See this very thorough presentation by Kyle Knoepfel at the 2019 LArSoft workshop. Several other talks at the workshop also focus on multi-threaded software. In short, if data are shared between threads and they are mutable, this is a recipe for race conditions and non-reproducible behavior of programs. Giving each thread a separate instance of each object is one way to contain possible race conditions. Alternately, private and public class members which do not change or which have synchronous access methods can also help provide thread safety.
Key Points
CPU, memory, and build time optimizations are possible when good code practices are followed.
Closing Remarks
Overview
Teaching: 10 min
Exercises: 0 minQuestions
Are you fortified with enough information to start your event analysis?
Objectives
Reflect on the days of learning.
Closing Remarks
Two Days of Training
The instruction in this one day version of the DUNE computing workshop was provided by several experienced physicists and is based on years of experience.
The secure access to Fermilab computing systems and a familiarity with data storage are key components.
Data management and event processing tools were described and modeled.
Art and LArSoft were introduced
We are thankful for the instructor’s hard work, and for the numerous participants who joined.
Survey time!
Please give us feedback on this training by filling out our S U R V E Y. Entries to the survey are anonymous, any impressions, praise, critiques and suggestions are appreciated.
Next Steps
Session recordings have been posted within each lesson after processed.
We invite you to bookmark this training site and to revisit the content regularly.
Point a colleague to the material.
Long Term Support
You made some excellent connections with computing experts and invite your continued dialog.
A DUNE Slack channel (#computing-training-basics) will remain available and we encourage your activity in the dialog.
See also the GitHub FAQ site for DUNE Computing.
Key Points
The DUNE Computing Consortium has presented this workshop so as to broaden the use of software tools used for analysis.